
# 【Flutter】Flutter 学习文档

# 前言:如果你要学习 flutter,那么你一定要会 dart 语言,因为 flutter 是基于 dart 来封装的一个 UI 组件包
# 本文使用 Typort 书写,禁止转载。
# 学习基础要求:
# 后端:有语言基础(C/C++/C#/Java/python/Golang 都可以)
# 前端 :(JavaScript,Html,CSS) 的人来学习。如果 0 基础,请先学习任意一门后端语言并熟练掌握!
# Dart 语言学习:
安装 Dart:https://github.com/GeKorm/dart-windows/releases/download/v1.6.0/Dart_x64.stable.setup.exe
安装好后配置环境变量:DART_HOME E:\dart\bin 安装路径
配置好后 cmd 输入 dart --version 查看环境
1
| Dart VM version: 2.3.3-dev.0.0.flutter-b37aa3b036 (Tue Jun 11 13:00:50 2019 +0000) on "windows_x64"
|
# 注释:
1
2
3
4
5
6
7
8
9
10
| /*
*多行注释
*多行注释
*/
/**
* 文档注释 与Java相同
*/
///文档注释 dart独有
|
# 变量定义:
dart 语言特点:
自动类型转换,var 声明的变量可以是任意类型!
dart 拥有两种变量定义方式。
指定类型:
String name = “brath”;
或者
类型推导
var name = “brath”; // 推导为任意类型
final name = “brath”; // 不可修改,定义常量,可以初始化
const name = “brath”; // 不可修改,定义常量,不可以初始化,可以被构造修改
1
2
3
4
5
6
7
8
9
10
11
12
| void main(){
var name = 111111;
String name1 = "brath用类型定义";
print("Hello World! Brath~");
print(name.runtimeType);
print(name1.runtimeType);
}
console:
Hello World! Brath~
int
String
|
# 变量拼接:
与 Java 不同,拼接方式用 ${}
如果只拼接普通变量,可以直接 $ 变量名
如果拼接变量引用方法,必须要 $
# 集合类型:
list 集合: var names = [“111”,“222”,“333”];
set 集合: var movies = {“111”,“222”,"333”};
map 集合:var info =
默认情况下,dart 的所有 class 都是隐式接口!
# Dart 函数使用:
1
2
3
4
5
6
7
8
| void main(List<String> args) {
print(sum(51, 14891));
}
int sum(int a,int b){
return a + b;
}
|
# 函数参数:
必选参数,不能有默认值,可选参数,可以有默认值
1
2
3
4
5
6
7
8
9
10
11
12
13
14
15
16
17
18
19
20
| main(){
sayHello("why");
}
void sayHello(String name){
print(name)
}
void sayHello2(String name, [int age, String desc]){
sayHello2("brath",12,"waa");
}
void sayHello3(String name, {int age, String desc}){
sayHello3("brath",age: 13,desc: "212");
}
|
# 函数是一等公民:
函数可以作为另外一个函数的参数!
1
2
3
4
5
6
7
8
9
10
11
12
13
14
15
16
17
18
19
20
| void main(List<String> args) {
test(() => print("箭头"));
}
void test(Function foo){
see();
}
void see(){
print("see!");
}
|
1
2
3
4
5
6
7
8
9
10
11
12
13
14
15
16
17
18
19
20
21
22
23
24
25
26
27
|
void main(List<String> args) {
var num = demo();
print(num(20,12));
}
typedef Calculate = int Function(int num1,int num2);
void test(Calculate calculate){
calculate(20,30);
}
Calculate demo(){
return (num1,num2){
return num1 * num2;
};
}
|
# 赋值运算符:
1
2
3
4
5
6
7
| Flutter中,有诡异的赋值运算符
比如 name ??="111";
解释:当原来的变量有值时,不执行
当原来的变量为null时,执行
或者 var name = name ?? "11";
解释: 当name不为空时使用name,为空使用后面的变量
|
# 级联运算符:
1
2
3
4
5
6
7
8
9
10
11
12
13
14
15
16
17
18
| void main(){
var p = Person()
..name = "brath"
..eat();
..run();
}
class Person(){
String name;
void eat(){
print("吃");
}
void run(){
print("跑");
}
}
|
# For 循环和 Switch 循环与 JS 和 Java 基本一致
# 构造函数:
1
2
3
4
5
6
7
8
9
10
| class Person{
String name;
int age;
double height;
//默认构造函数
Person(this.name.this.age);
//命名构造函数,指定名字的构造函数
Person.NameCon(this.name.this.age,this.height);
}
|
# dynamic:
1
2
3
4
5
6
7
8
| dynamic代表任意类型
dynamic obj = "obj";
print(obj.subString(1));
Object obj = "obj";
print(obj.subString(1));
|
# 初始化列表:
1
2
3
4
5
6
7
8
9
10
11
| mian(){
var p = Person('brath');
}
class Person{
final String name;
final int age;
Person(this.name,{int age}): this.age = age ?? 10;
}
|
# 构造函数重定向:
1
2
3
4
5
6
7
8
9
10
11
12
| mian(){
}
class Person{
String name;
int age;
Person(String name) : this._internal(name,0);
Person._internal(this.name,this.age)
}
|
# 工厂构造函数:
1
2
3
4
5
6
7
8
9
10
11
12
13
14
15
16
17
18
19
|
class Person{
String name;
String color;
static final Map<String,Person> _nameCache = {};
static final Map<String,Person> _colorCache = {};
factory Person.withName(String name){
if(_nameCache.containsKey(name)){
return _nameCache[name];
}else{
_nameCache[name] = Person(name,"default");
return Person(name,"default");
}
}
}
|
# Getter 和 Setter:
1
2
3
4
5
6
7
8
9
10
11
12
13
14
15
16
17
18
19
20
21
22
23
24
25
26
27
|
void main(List<String> args) {
final p = Person();
p.name = "brath";
print(p.name);
p.setName("brath.cloud");
print(p.getName);
}
class Person{
late String name;
void setName(String name) => this.name = name;
String get getName => name;
}
|
# 隐式接口:
# 类的混入:
1
2
| 用class声明的类不可以混入其他类
要混入其他类,使用 mixin 声明该类,并在混入时用with关键字来连接被混入的类
|
# 类属性和类方法:
1
2
3
4
| 类属性:在类中不用static声明的变量,叫做成员变量,不可以被类直接调用
静态属性:在类中用static声明的变量,叫做静态属性,类属性,可以被类直接调用
类方法:在类中不用static声明的方法,叫做成员方法,不可以被类直接调用
静态方法:在类中用static声明的方法,叫做静态方法,类属性,可以被类直接调用
|
# 枚举的使用:
1
2
3
4
5
6
7
8
9
10
11
12
13
14
15
16
17
18
19
20
21
22
23
24
25
| void main(List<String> args) {
final color = Colors.bule;
switch(color){
case Colors.bule:
print("蓝色");
break;
case Colors.red:
print("红色");
break;
case Colors.yellow:
print("黄色");
break;
}
print(Colors.values);
}
enum Colors{
red,
bule,
yellow
}
|
# 库的使用:
1
2
3
4
5
6
7
8
9
10
11
12
13
|
import 'utils/TimeUtil' as timeUtil;
show hide
import 'utils/TimeUtil' show timeUtil;
import 'utils/TimeUtil' hide timeUtil;
import 'utils/TimeUtil' show timeUtil, FileUtil;
import 'utils/TimeUtil' hide timeUtil, FileUtil;
|
# 抽取公共库文件:
1
2
3
4
5
6
7
8
9
10
| 以上方法导入库的时候总是会遇到一些问题,比如如果有100个方法,你只想用50个,那么你就要用50个show或者50个hide,但是dart提供了一种方式,就是抽取库到一个公共类中。
前面提到过,dart中所有文件都是一个库,那么我们把需要导入的库,全部export到一个库中,在引用这个库,就不用担心过多引入了。
公共库:
util.dart
export 'util/TimeUtil'
export 'util/FileUtil'
我的代码:
import 'util';
|
# 使用第三方库:
1
2
3
4
5
6
| name: 库名
desciption: 描述
dependencies: 依赖
http: ^0.13.4
怎么找库?
https://pub.dev/packages/http
|
点击 installing
把 dependencies 内容复制到代码中
1
2
3
4
5
6
| name: coderwhy
desciption: a dart
dependencies:
http: ^0.12.0+4
environment:
sdk: '>=2.10.0 < 3.0.0'
|
进入当前类文件夹,终端输入 pub get 就会下载对应库包
1
2
3
4
5
6
7
8
9
| import 'package:http/http.dart' as http;
void main() async {
var url = 'https://www.brath.cloud:9000/esn-user-service/user/getUserInfo?id=1';
var url2 = 'https://brath.cloud/image/back.png';
var response = await http.get(url);
print(response.body);
}
|
# 异常处理:
与 Java 相同但是有不一样的部分:
同步处理
在一个方法中用 try 捕获异常,如果调用方法就捕获不到了!
异步处理
调用一个异步方法如果发生异常,可以用自异步 + await 来捕获异常
1
2
3
4
5
6
7
8
9
10
11
12
|
void main() async{
try{
await test1();
}catch(e){
print(e);
}
}
test1() async{
print(11~/0);
}
|
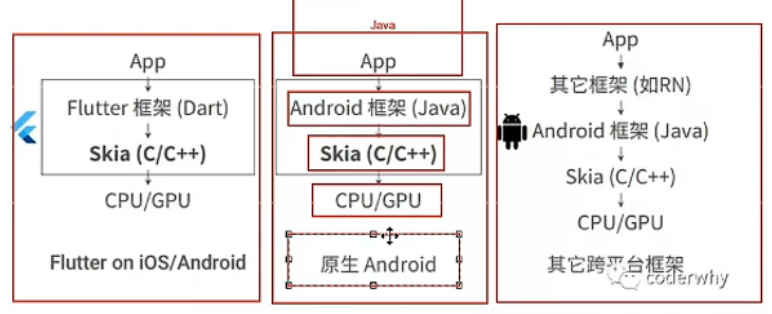
# 接下来介绍 我们的 Flutter!
# 最好的跨平台解决方案 Flutter
架构对比:
# GUP 绘制出图像,放到 Buffer 缓存中,手机屏幕根据刷新率来读取缓存的操作,就是展示图像。 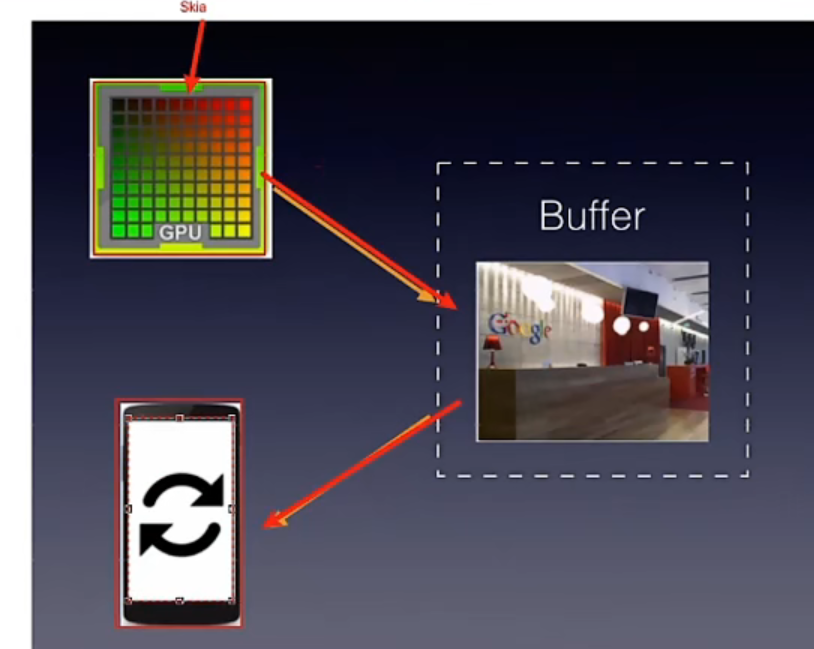
# 引出了一个概念:垂直同步
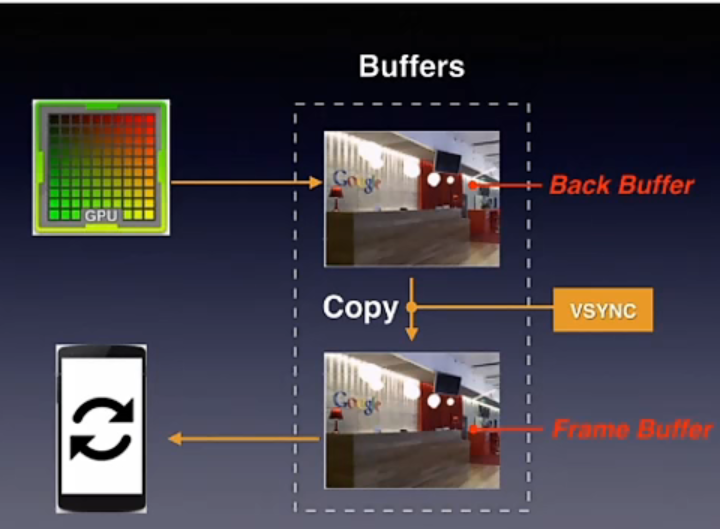
为什么要有垂直同步?
来看一个例子:假设我 GPU 每秒帧率产生 60,手机屏幕每秒也是接受 60,这时可以正常显示。
如果突然每秒帧率提高到 120,手机屏幕可能会来不及读取缓存导致画面重叠、撕裂
开启垂直同后,会有两块缓存区域。
垂直同步就限制了手机屏幕读取缓存和 GPU 产生的速度,开启垂直同步后,GPU 将画面写入到第一个缓存中,第一个缓存会复制内容(地址交换)到第二个缓存中,当两份缓存都存在这一帧,就会发送一个 VSync 的信号,告诉 GPU 可以绘制下一张图,然后手机屏幕来显示第二个缓存中的内容,这样就可以避免图像撕裂。
# 一个简单的 flutter 结构:
1
2
3
4
5
6
7
8
9
10
11
12
13
14
15
16
17
18
19
20
21
22
23
24
25
26
27
28
29
30
31
32
33
34
35
36
37
38
39
40
| import 'package:flutter/material.dart';
void main() {
runApp(const MyApp());
}
class MyApp extends StatelessWidget{
@override
Widget build(BuildContext context) {
return MaterialApp(
home: BrathScaffoldPage()
);
}
}
class BrathScaffoldPage extends StatelessWidget{
@override
Widget build(BuildContext context) {
return Scaffold(
appBar: AppBar(
centerTitle: true,
title: Text("第一个Fullter程序",style: TextStyle(fontSize: 20),),
),
body: BrathBodyPage()
);
}
}
class BrathBodyPage extends StatelessWidget{
@override
Widget build(BuildContext context) {
return Text("Hello Fullter");
}
}
|
# 开始学习:
# 下载 Flutter SDK
配置 Flutter 的第一步就是下载 Flutter SDK,然后进行安装,上面两个地址都有给 SDK 下载地址,这里的问题是有的 SDK 安装包有时会报 没有.git 文件的错误,所以最稳妥的方法是通过 git clone 命令安装
在安装目录下面执行
1
| git clone -b stable https://github.com/flutter/flutter.git
|

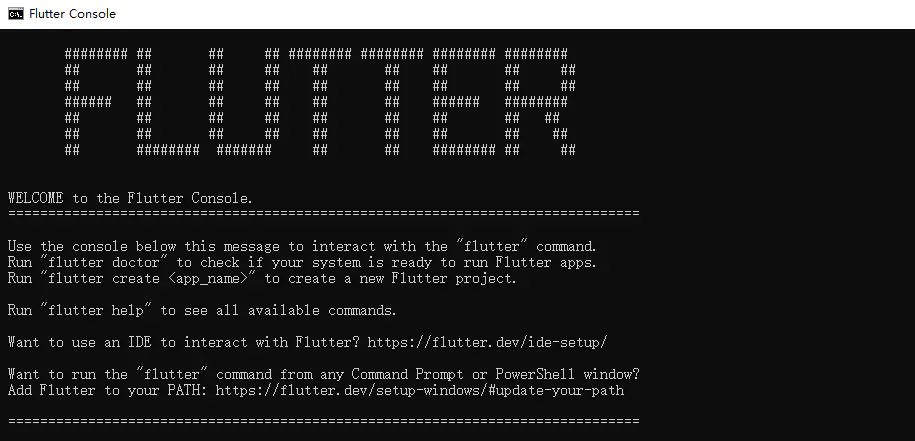
安装完成之后,可以在安装根目录,找的 flutter_console.bat 文件,双击运行
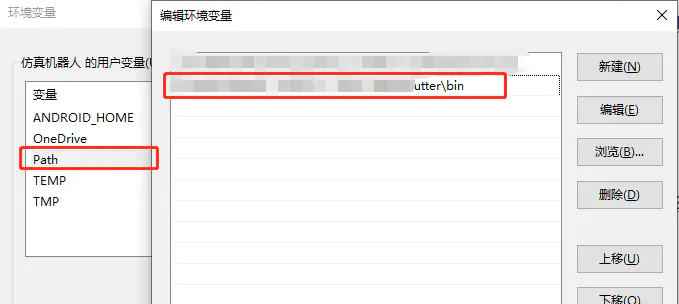
# 配置 Flutter 运行环境变量
在用户变量里面编辑或者添加 Path 条目,把 Flutter 的 bin 目录路径添加在里面
# 运行 Flutter
在命令行运行 flutter doctor,它会下载它自己的依赖项并自行编译,一般情况是会报错提示,多半是 Android SDK 找不到什么的,如果出错了,就按照错误信息网上查一下就解决了。
我的已经处理完成的

# 编辑器设置
我用的 Android Studio,上面连接里面有不同系统和编辑器的流程,详情可以前往查看
Android Studio 的开发环境就不说了,需要的可以自行百度。Android Studio 配置 Flutter 开发主要是 Flutter 和 Dart 两个插件
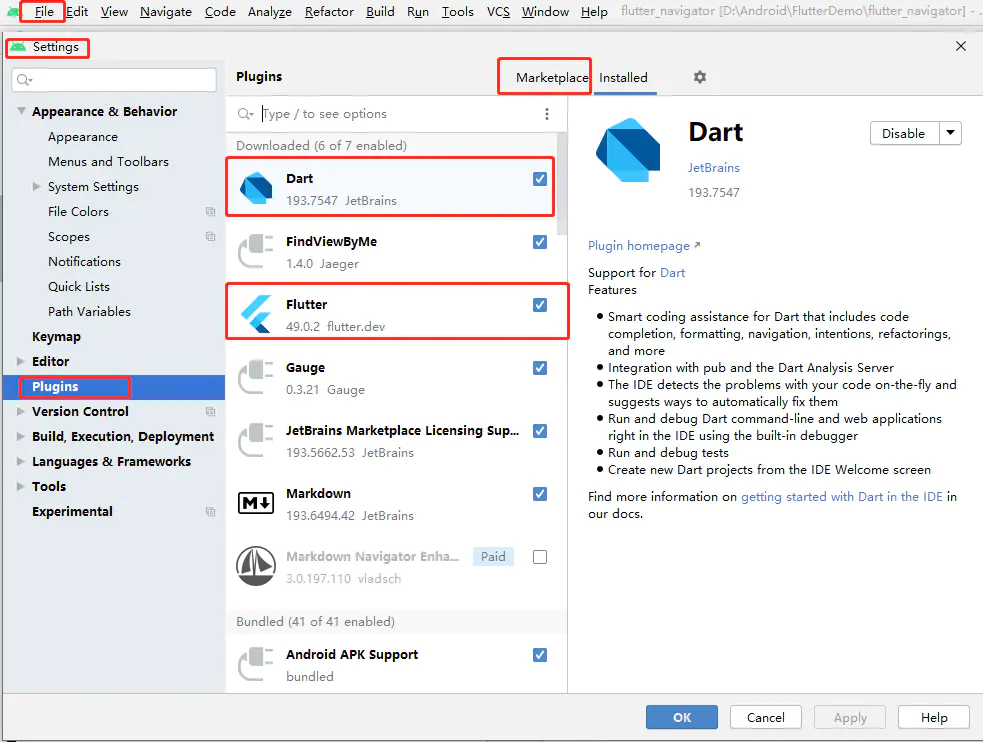
File – Settings – Plugins – Marketplace 然后在搜索里面搜索 Flutter 和 Dart 安装就可以了。
安装完插件,重启一下 Android Studio 基本就配置完成了,可以新建 Flutter 项目了。
# 新建 Flutter 项目
File – New – New Flutter Project
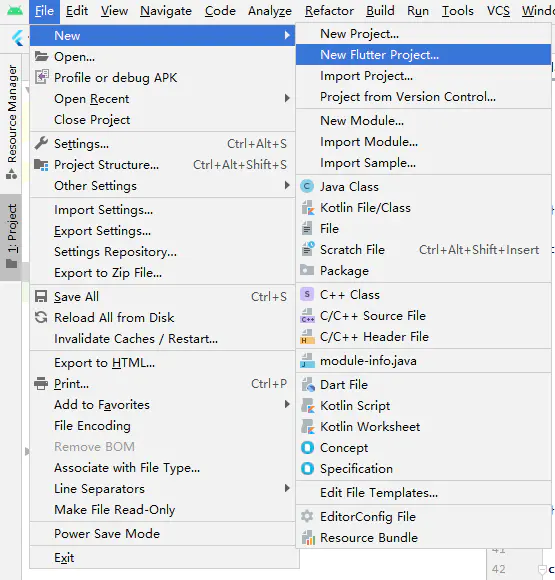
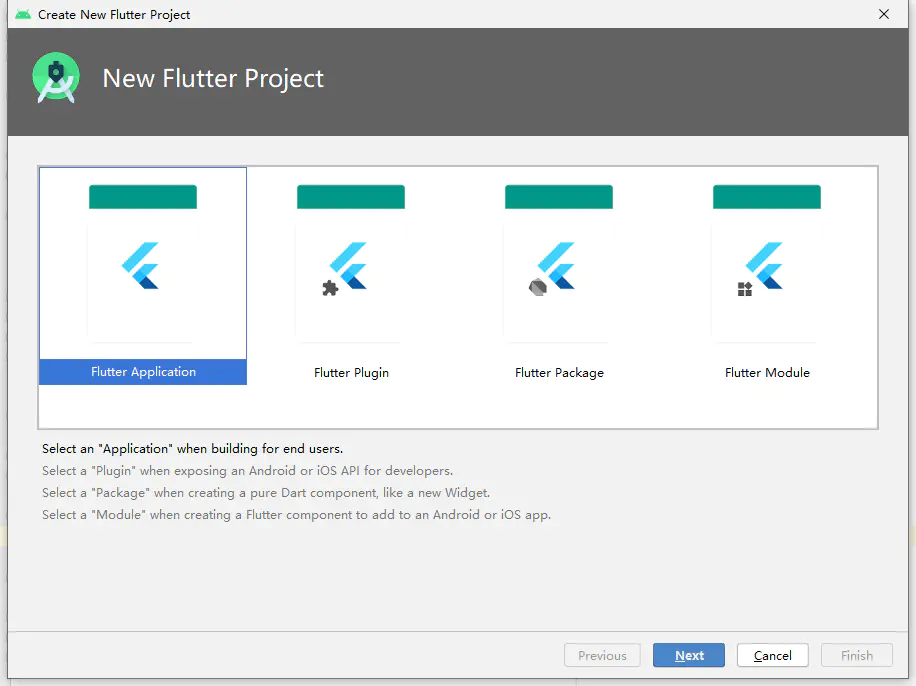
选择 Flutter Application
然后到这个最后一步的时候,会有一点小问题
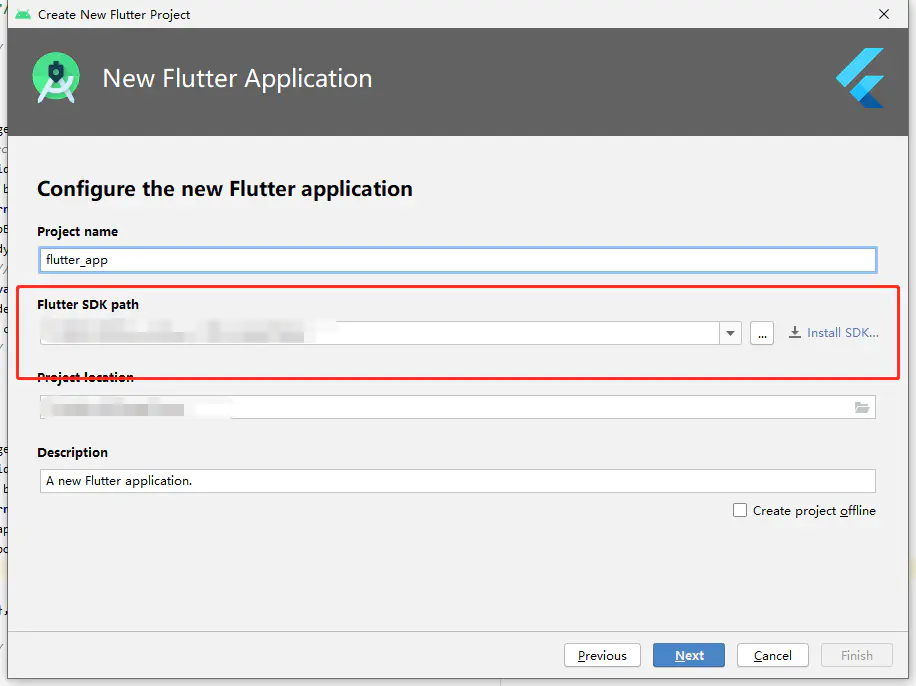
Flutter SDK path 这一栏第一次默认是空的,需要手动选择,选择我们最开始下载的 Flutter SDK,选择根目录,就可以了
# 至此 Flutter 的开发环境安装完毕!
# 现在开始学习 Flutter 的基础组件,以及进阶理论!
# flutter 学习笔记 auther:Brath
# 所有的重点都在代码的注释中标注!
# 创建项目:
到想存储项目的文件路径,打开 CMD,输入 flutter create 项目名称即可

vscode 下载好插件,dart 和 flutter 打开对应 flutter 文件,即可开始编写
1
2
3
4
5
6
7
8
9
10
11
12
13
14
| import 'package:flutter/material.dart';
main() {
runApp(MyApp());
}
class MyApp extends StatelessWidget {
@override
Widget build(BuildContext context) {
return MaterialApp(
);
}
}
|
# 特性:
无状态的 widget 是静态页面
有状态的 widget 是动态页面
# 要点:
# tips:flutter 的 main 入口调用第一个 widget 需要该 widget 使用 MaterialApp () 作为首个 widget
因为 MaterialApp 包含了路由主题等等组件,flutter 规定只能用 MaterialApp 当作根节点
# 使用 MaterialApp 的 home 属性来指定页面
1
2
3
4
5
6
7
8
9
| class MyApp extends StatelessWidget {
@override
Widget build(BuildContext context) {
return MaterialApp(
debugShowCheckedModeBanner: false,
home: HomePage(),
);
}
}
|
均为可选参数
1
2
3
4
5
6
7
8
9
10
11
12
13
14
15
16
17
18
19
20
21
22
23
24
25
26
27
28
29
30
31
| Container({
Key? key,
this.alignment,
this.padding,
this.color,
this.decoration,
this.foregroundDecoration,
double? width,
double? height,
BoxConstraints? constraints,
this.margin,
this.transform,
this.transformAlignment,
this.child,
this.clipBehavior = Clip.none,
}) : assert(margin == null || margin.isNonNegative),
assert(padding == null || padding.isNonNegative),
assert(decoration == null || decoration.debugAssertIsValid()),
assert(constraints == null || constraints.debugAssertIsValid()),
assert(clipBehavior != null),
assert(decoration != null || clipBehavior == Clip.none),
assert(color == null || decoration == null,
'Cannot provide both a color and a decoration\n'
'To provide both, use "decoration: BoxDecoration(color: color)".',
),
constraints =
(width != null || height != null)
? constraints?.tighten(width: width, height: height)
?? BoxConstraints.tightFor(width: width, height: height)
: constraints,
super(key: key);
|
# Text 文本组件 (widget):
Text 默认传一个文本:
1
2
3
4
5
6
7
8
9
10
11
12
13
14
15
16
17
18
19
| class TextDemo extends StatelessWidget
@override
Widget build(BuildContext context) {
return Container(
width: double.infinity,
color: Colors.blue,
child: Text(
"文本" * 20,
maxLines: 1,
textDirection: TextDirection.ltr,
textAlign: TextAlign.center,
style: TextStyle(
fontSize: 30,
color: Colors.teal
),
)
);
}
}
|
1
2
3
4
5
6
7
8
9
10
11
12
13
14
15
16
17
18
19
20
21
22
23
24
| const Text(
String this.data,
{
Key? key,
this.style,
this.strutStyle,
this.textAlign,
this.textDirection,
this.locale,
this.softWrap,
this.overflow,
this.textScaleFactor,
this.maxLines,
this.semanticsLabel,
this.textWidthBasis,
this.textHeightBehavior,
}) : assert(
data != null,
'A non-null String must be provided to a Text widget.',
),
textSpan = null,
super(key: key);
|
flutter 中有几种常用按钮组件:
在 2.0 版本后遗弃按钮 RaisedButton 改为 ElevatedButton , FlatButton 改为 TextButton
1
2
| RaisedButton 已遗弃
FlatButton 已遗弃
|

1
2
3
4
5
6
7
8
9
10
11
12
13
14
15
16
17
| class ButtonDemo extends StatelessWidget {
@override
Widget build(BuildContext context) {
return Column(
children: [
ElevatedButton(
onPressed:(){
},
child: Text(
"漂浮按钮"
)
)
],
);
}
}
|
# TextButton:扁平按钮 / 文本按钮

1
2
3
4
5
6
7
8
9
10
11
12
13
14
15
16
17
| class ButtonDemo extends StatelessWidget {
@override
Widget build(BuildContext context) {
return Column(
children: [
TextButton(
onPressed: (){
},
child: Text(
"扁平按钮"
))
],
);
}
}
|
# TextButton.icon:带图标的扁平按钮 / 文本按钮
1
2
3
4
5
6
7
8
9
10
11
12
13
| class ButtonDemo extends StatelessWidget {
@override
Widget build(BuildContext context) {
return Column(
children: [
TextButton.icon(onPressed: (){},
icon: Icon(Icons.add),
label: Text("图标按钮"))
],
);
}
}
|
1
2
3
4
5
6
7
8
9
10
11
12
| class ButtonDemo extends StatelessWidget {
@override
Widget build(BuildContext context) {
return Column(
children: [
OutlinedButton(onPressed: (){},
child: Text("无阴影按钮"))
],
);
}
}
|

1
2
3
4
5
6
7
8
9
10
11
| class ButtonDemo extends StatelessWidget {
@override
Widget build(BuildContext context) {
return Column(
children: [
IconButton(onPressed: (){},
icon: Icon(Icons.home))
],
);
}
}
|
flutter 提供了四种图片加载方式: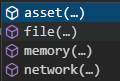
1、Image.network // 从网络获取图片
2、Image.asset // 从项目本地获取图片
3、Image.file // 从文件路径获取图片
4、Image.memory // 从手机内存,存储中获取图片
使用 asset 需要设置 pubspec.yaml 中的 assets 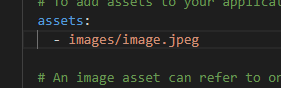
1
2
3
4
5
6
7
8
9
10
11
12
13
14
15
16
17
18
19
| class ImageIconDemo extends StatelessWidget {
@override
Widget build(BuildContext context) {
return Column(
children: [
Icon(Icons.home),
IconButton(onPressed: (){}, icon: Icon(Icons.home)),
Container(
width: double.infinity,
child: Image.network(
"https://brath.cloud/love/GCLK6888.JPG?versionId=CAEQNxiBgID8yJjchBgiIDUzZGFiMWU3YWVlNDQ4YmJhMzMwNDY0Mzk1OGJiOTU1",
fit: BoxFit.fill,
),
),
Image.asset("images/image.jpeg"),
],
);
}
}
|
因为开关和复选框是动态的,有状态的,所以我们要使用 StatefulWidget 来做他们的 widget
Check 复选框
1
2
3
4
5
6
7
8
9
10
11
12
13
14
15
16
17
18
19
20
21
| class CheckDemo extends StatefulWidget {
@override
State<CheckDemo> createState() => _CheckDemoState();
}
class _CheckDemoState extends State<CheckDemo> {
bool _check = false;
@override
Widget build(BuildContext context) {
return Column(
children: [
Checkbox(
value: _check,
onChanged: (res){
setState(() {
_check = res!;
});
}),
],
);
}
}
|
Switch 开关
1
2
3
4
5
6
7
8
9
10
11
12
13
14
15
16
17
18
19
20
21
| class CheckDemo extends StatefulWidget {
@override
State<CheckDemo> createState() => _CheckDemoState();
}
class _CheckDemoState extends State<CheckDemo> {
bool _switch = false;
@override
Widget build(BuildContext context) {
return Column(
children: [
Switch(
value: _switch,
onChanged: (res){
setState(() {
_switch = res;
});
})
],
);
}
}
|
flutter 为我们提供了几种进度条和指示器样式
1、LinearProgressIndicator 线性指示器 
2、CircularProgressIndicator 圆圈指示器 
3、CupertinoActivityIndicator IOS 风格的进度指示器 
可以设置的参数:
value:可以设置 0 - 1,来表示当前进度
valueColor:使用 AlwaysStoppedAnimation (Colors.red) 动画包裹颜色设置进度指示器的颜色
1
2
3
4
5
6
7
8
9
10
11
12
13
14
15
16
17
18
19
20
21
22
23
24
25
26
| class ProgressDemo extends StatelessWidget {
@override
Widget build(BuildContext context) {
return Padding(
padding: EdgeInsets.all(10),
child: Column(
children: [
LinearProgressIndicator(
value: .5,
valueColor: AlwaysStoppedAnimation(Colors.red),
),
SizedBox(height: 16),
Container(
height: 100,
width: 100,
child: CircularProgressIndicator(
valueColor: AlwaysStoppedAnimation(Colors.red),
),
),
SizedBox(height: 16),
CupertinoActivityIndicator(),
]),
);
}
}
|
flutter 为我们提供了 GestureDetector 手势检测器
1
2
3
4
5
6
7
8
9
10
11
12
13
14
| class ClickDemo extends StatelessWidget {
@override
Widget build(BuildContext context) {
return GestureDetector(
onTap: (){
print("点击");
},
onDoubleTap: (){
print("双击");
},
child: Text("点击组件"),
);
}
}
|
flutter 为我们提供了两种常用输入组件:
TextField:默认典型输入框,没有 validator 验证
TextFromField:特点是可以带参数校验 validator 一般用于登录注册表单验证
# TextField 源码
1
2
3
4
5
6
7
8
9
10
11
12
13
14
15
16
17
18
19
20
21
22
23
24
25
26
27
28
29
30
31
32
33
34
35
36
37
38
39
40
41
42
43
44
45
46
47
48
49
50
51
52
53
54
55
56
57
58
59
60
61
| const TextField({
Key? key,
this.controller,
this.focusNode,
this.decoration = const InputDecoration(),
TextInputType? keyboardType,
this.textInputAction,
this.textCapitalization = TextCapitalization.none,
this.style,
this.strutStyle,
this.textAlign = TextAlign.start,
this.textAlignVertical,
this.textDirection,
this.readOnly = false,
ToolbarOptions? toolbarOptions,
this.showCursor,
this.autofocus = false,
this.obscuringCharacter = '•',
this.obscureText = false,
this.autocorrect = true,
SmartDashesType? smartDashesType,
SmartQuotesType? smartQuotesType,
this.enableSuggestions = true,
this.maxLines = 1,
this.minLines,
this.expands = false,
this.maxLength,
@Deprecated(
'Use maxLengthEnforcement parameter which provides more specific '
'behavior related to the maxLength limit. '
'This feature was deprecated after v1.25.0-5.0.pre.',
)
this.maxLengthEnforced = true,
this.maxLengthEnforcement,
this.onChanged,
this.onEditingComplete,
this.onSubmitted,
this.onAppPrivateCommand,
this.inputFormatters,
this.enabled,
this.cursorWidth = 2.0,
this.cursorHeight,
this.cursorRadius,
this.cursorColor,
this.selectionHeightStyle = ui.BoxHeightStyle.tight,
this.selectionWidthStyle = ui.BoxWidthStyle.tight,
this.keyboardAppearance,
this.scrollPadding = const EdgeInsets.all(20.0),
this.dragStartBehavior = DragStartBehavior.start,
this.enableInteractiveSelection = true,
this.selectionControls,
this.onTap,
this.mouseCursor,
this.buildCounter,
this.scrollController,
this.scrollPhysics,
this.autofillHints = const <String>[],
this.clipBehavior = Clip.hardEdge,
this.restorationId,
this.enableIMEPersonalizedLearning = true,
})
|
# TextFromField 源码
1
2
3
4
5
6
7
8
9
10
11
12
13
14
15
16
17
18
19
20
21
22
23
24
25
26
27
28
29
30
31
32
33
34
35
36
37
38
39
40
41
42
43
44
45
46
47
48
49
50
51
52
53
54
55
56
57
58
| Key? key,
this.controller,
String? initialValue,
FocusNode? focusNode,
InputDecoration? decoration = const InputDecoration(),
TextInputType? keyboardType,
TextCapitalization textCapitalization = TextCapitalization.none,
TextInputAction? textInputAction,
TextStyle? style,
StrutStyle? strutStyle,
TextDirection? textDirection,
TextAlign textAlign = TextAlign.start,
TextAlignVertical? textAlignVertical,
bool autofocus = false,
bool readOnly = false,
ToolbarOptions? toolbarOptions,
bool? showCursor,
String obscuringCharacter = '•',
bool obscureText = false,
bool autocorrect = true,
SmartDashesType? smartDashesType,
SmartQuotesType? smartQuotesType,
bool enableSuggestions = true,
@Deprecated(
'Use maxLengthEnforcement parameter which provides more specific '
'behavior related to the maxLength limit. '
'This feature was deprecated after v1.25.0-5.0.pre.',
)
bool maxLengthEnforced = true,
MaxLengthEnforcement? maxLengthEnforcement,
int? maxLines = 1,
int? minLines,
bool expands = false,
int? maxLength,
ValueChanged<String>? onChanged,
GestureTapCallback? onTap,
VoidCallback? onEditingComplete,
ValueChanged<String>? onFieldSubmitted,
FormFieldSetter<String>? onSaved,
FormFieldValidator<String>? validator,
List<TextInputFormatter>? inputFormatters,
bool? enabled,
double cursorWidth = 2.0,
double? cursorHeight,
Radius? cursorRadius,
Color? cursorColor,
Brightness? keyboardAppearance,
EdgeInsets scrollPadding = const EdgeInsets.all(20.0),
bool enableInteractiveSelection = true,
TextSelectionControls? selectionControls,
InputCounterWidgetBuilder? buildCounter,
ScrollPhysics? scrollPhysics,
Iterable<String>? autofillHints,
AutovalidateMode? autovalidateMode,
ScrollController? scrollController,
String? restorationId,
bool enableIMEPersonalizedLearning = true,
})
|
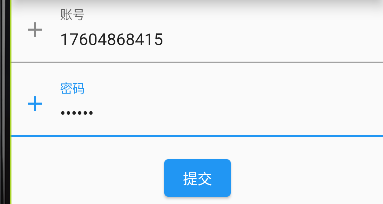
简易登录
1
2
3
4
5
6
7
8
9
10
11
12
13
14
15
16
17
18
19
20
21
22
23
24
25
26
27
28
29
30
31
32
33
34
35
36
37
38
39
40
41
42
43
44
45
46
47
48
49
50
51
52
53
54
55
56
57
58
59
60
61
62
63
64
65
66
67
68
69
70
71
72
73
74
75
| class InputDemo extends StatefulWidget {
@override
State<InputDemo> createState() => _InputDemoState();
}
class _InputDemoState extends State<InputDemo> {
GlobalKey _key = GlobalKey<FormState>();
TextEditingController _rootController = TextEditingController();
TextEditingController _passController = TextEditingController();
FocusNode _r = FocusNode();
FocusNode _p = FocusNode();
@override
void dispose() {
super.dispose();
_rootController.dispose();
_passController.dispose();
_r.dispose();
_p.dispose();
}
@override
Widget build(BuildContext context) {
return Form(
key: _key,
child: Column(
children: [
TextFormField(
autofocus: true,
focusNode: _r,
controller: _rootController,
decoration: InputDecoration(
prefixIcon: Icon(Icons.add),
labelText: "账号",
hintText: "默认文字"
),
validator: (v){
if(v == null || v.isEmpty){
return "账号不能为空!";
}
},
textInputAction: TextInputAction.next,
onFieldSubmitted: (v){
print("brath");
},
),
SizedBox(height: 8),
TextFormField(
focusNode: _p,
controller: _passController,
decoration: InputDecoration(
prefixIcon: Icon(Icons.add),
labelText: "密码",
hintText: "输入密码"
),
obscureText: true,
validator: (v){
if(v == null || v.length < 5){
return "密码不能小于5位数!";
}
},
textInputAction: TextInputAction.send,
),
SizedBox(height: 16),
ElevatedButton(
onPressed: (){
print((_key.currentState as FormState).validate().toString());
},
child: Text("提交"),
),
]),
);
}
}
|
# Flutter 路由工具:
var res = await Navigator.of (context).push ( // 跳转路由到 MenuPage 并可以接受返回值
这段代码用异步来监听返回值,优点是,无论是否点击按钮返回,都可以接收到返回值
还可以用 .then ((value) => print (value)); 的方式来获取,这样更简洁,只有返回的时候才会监听,不返回不监听
1
2
3
4
5
6
7
8
9
10
11
12
13
14
15
16
17
18
19
20
21
22
23
24
25
26
27
28
29
30
31
32
33
34
35
36
37
38
39
40
41
42
43
44
45
46
47
48
49
50
51
52
53
54
55
56
57
58
|
import 'package:flutter/material.dart';
class LoginPage extends StatelessWidget {
@override
Widget build(BuildContext context) {
return Scaffold(
appBar: AppBar(
title: Text("登录"),
elevation: 10.0,
centerTitle: true,
),
body: ElevatedButton(
onPressed: () async {
var res = await Navigator.of(context).push(
MaterialPageRoute(
builder: (context) {
return MenuPage(
menuTitle: "菜单",
);
},
settings: RouteSettings(
name: "参数",
arguments: "我是参数",
),
maintainState: false,
fullscreenDialog: true,
));
print(res);
},
child: Text("登录"),
),
);
}
}
class MenuPage extends StatelessWidget {
final String menuTitle;
const MenuPage({Key? key,required this.menuTitle}) : super(key: key);
@override
Widget build(BuildContext context) {
dynamic arguments = ModalRoute.of(context)?.settings.arguments;
return Scaffold(
appBar: AppBar(
title: Text(menuTitle + " " + arguments),
),
body: ElevatedButton(
onPressed: (){
Navigator.of(context).pop("Brath");
},
child: Text("返回按钮"),
),
);
}
}
|
Flutter 中管理多个页面时有两个核心概念和类: Route 和 Navigator 。
一个 route 是一个屏幕或页面的抽象, Navigator 是管理 route 的 Widget 。 Navigator 可以通过 route 入栈和出栈来实现页面之间的跳转。
路由一般分为静态路由 (即命名路由) 和动态路由。
# 静态路由 (即命名路由)
静态路由在通过 Navigator 跳转之前,需要在 MaterialApp 组件内显式声明路由的名称,而一旦声明,路由的跳转方式就固定了。通过在 MaterialApp 内的 routes 属性进行显式声明路由的定义。
1
2
3
4
5
6
7
8
9
10
11
12
13
14
15
16
17
| class MyApp extends StatelessWidget {
@override
Widget build(BuildContext context) {
return MaterialApp(
initialRoute: "/",
routes: {
"A":(context) => Apage(),
"B":(context) => Bpage(),
"C":(context) => Cpage(),
},
);
}
}
注意:如果指定了home属性,routes表则不能再包含此属性。
如上代码中【home: RootPage()】 和 【"/":(context) => RootPage()】两则不能同时存在。
|
例如: RootPage 跳转 Apage 即: RootPage —> Apage
1
| Navigator.of(context).pushNamed("A");
|
一般方法中带有 Name 多数是通过静态路由完成跳转的,如 pushNamed 、 pushReplacementNamed 、 pushNamedAndRemoveUntil 等。
# 动态路由
动态路由无需在 MaterialApp 内的 routes 中注册即可直接使用:RootPage —> Apage
1
2
3
| Navigator.of(context).push(MaterialPageRoute(
builder: (context) => Apage(),
));
|
动态路由中,需要传入一个 Route , 这里使用的是 MaterialPageRoute ,它可以使用和平台风格一致的路由切换动画,在 iOS 上左右滑动切换,Android 上会上下滑动切换。也可以使用 CupertinoPageRoute 实现全平台的左右滑动切换。
当然也可以自定义路由切换动画,使用 PageRouteBuilder : 使用 FadeTransition
做一个渐入过渡动画。
1
2
3
4
5
6
7
8
9
10
11
12
| Navigator.of(context).push(
PageRouteBuilder(
transitionDuration: Duration(milliseconds: 250),
pageBuilder: (BuildContext context,Animation animation,
Animation secondaryAnimation){
return FadeTransition(
opacity: animation,
child: Apage()
);
}
)
);
|
到现在为止,可能对路由有了一定的认识,,下面就结合具体方法来详细说明。
在这之前有必要说明:
Navigator.of(context).push 和 Navigator.push 两着并没有特别的区别,看源码也得知,后者其实就是调用了前者。
of :获取 Navigator 当前已经实例的状态。
# 路由拦截:
flutter 提供了 onGenerateRoute 来使用路由拦截器,作用于强制登录
1
2
3
4
5
6
7
8
9
10
11
12
13
14
15
16
17
18
19
20
21
22
23
24
25
26
27
28
29
| class MyApp extends StatelessWidget {
@override
Widget build(BuildContext context) {
return MaterialApp(
debugShowCheckedModeBanner: false,
initialRoute: "/",
routes: {
"/" :(context) => LoginPage(),
},
onGenerateRoute: (RouteSettings s){
print(s.name);
if(s.name != "menu"){
return MaterialPageRoute(builder: (context){
return LoginPage();
},settings: s);
}
switch(s.name){
case "menu" :
return MaterialPageRoute(builder: (context){
return MenuPage();
},settings: s);
break;
}
},
);
}
}
|
# 路由方法解释:
# pop
返回当前路由栈的上一个界面。
Navigator.pop(context);
# push / pushNamed :
见上,两者运行效果相同,只是调用不同,都是将一个 page 压入路由栈中。直白点就是 push 是把界面直接放入, pushNames 是通过路由名的方式,通过 router 使界面进入对应的栈中。
结果:直接在原来的路由栈上添加一个新的 page 。
# pushReplacement / pushReplacementNamed / popAndPushNamed
替换路由,顾名思义替换当前的路由。
例如

Replacement.png
由图可知在 BPage 使用替换跳转到 Cpage 的时候, Bpage 被 Cpage 替换了在堆栈中的位置而移除栈, CPage 默认返回的是 APage 。
# pushReplacement 使用的动态路由方式跳转:
1
2
3
| Navigator.of(context).pushReplacement(MaterialPageRoute(
builder: (context) => Cpage(),
));
|
# pushReplacementNamed 使用的静态路由方式,
1
| Navigator.of(context).pushReplacementNamed("/C");
|
两者运行效果相同。
# popAndPushNamed:
1
| Navigator.of(context).popAndPushNamed("/C");
|
其实和上面两个方法运行的结果也是一致,区别就是动画效果不一样: BPage —> CPage 的时候, CPage 会同时有 pop 的转场效果和从 BPage 页 push 的转场效果。简单来说就是 CPage 先 pop 到 BPage ,在 push 到 CPage 。(不知道是不是卡顿的原因,笔者看起来区别不大)
综上:3 中方法结果一样,只是调用方式和过渡动画的区别,开发者自行选择。
# pushAndRemoveUntil / pushNamedAndRemoveUntil
在使用上述方式跳转时,会按次序移除其他的路由,直到遇到被标记的路由( predicate 函数返回了 true )时停止。若 没有标记的路由,则移除全部。
当路由栈中存在重复的标记路由时,默认移除到最近的一个停止。
# 第一种
1
2
3
|
Navigator.pushAndRemoveUntil(context,
MaterialPageRoute(builder: (_) => CPage()), (Route router) => router == null);
|
或
1
2
|
Navigator.of(context).pushNamedAndRemoveUntil("/C", (Route router) => router == null);
|
此时的路由栈示意图:

RemoveUntil_all.png
可知出了要 push 的 CPage ,当前路由栈中所有的路由都被移除, CPage 变成根路由。
# 第二种:移除到 RootPage 停止
1
2
3
4
5
6
7
|
Navigator.pushAndRemoveUntil(context,
MaterialPageRoute(builder: (_) => CPage()), ModalRoute.withName('/'))
或
Navigator.pushAndRemoveUntil(context,
MaterialPageRoute(builder: (_) => CPage()), (Route router) => router.settings.name == "/");
|
或
1
2
3
| Navigator.of(context).pushNamedAndRemoveUntil("/C", (Route router) => router.settings.name == "/");
或
Navigator.of(context).pushNamedAndRemoveUntil("/C", ModalRoute.withName("/"));
|
此时的路由栈示意图:

RemoveUntil_until.png
push 到 CPage 的时候,移除到 RootPage 停止, CPage 默认返回 RootPage 。
# popUntil
返回到指定的标记路由,若标记的路由为 null ,则程序退出,慎用!!!
有时候我们需要根据业务需求判断:可能返回上一级路由,也可能返回上上级路由或是返回指定的路由等。这个时候就不能使用 Replacemen t 和 RemoveUntil 来替换、移除路由了。
例如:

until.png
1
2
3
| Navigator.of(context).popUntil((route) => route.settings.name == "/");
或
Navigator.of(context).popUntil(ModalRoute.withName("/"));
|
再例如:

要实现上述功能,从 CPage 返回到 APage ,并且不在 MaterialApp 内的 routes 属性进行显式声明路由。因为笔者觉得一个应用程序的界面太多了,如果每个界面都要显示声明路由,实在是不优雅。
因为需要返回 APage ,还是需要标记路由,所有我们在之前跳转 APage 的时候设置 RouteSettings ,如下:
1
2
3
4
5
|
Navigator.of(context).push(MaterialPageRoute(
settings: RouteSettings(name:"/A"),
builder: (context) => APage(),
));
|
在 CPage 需要返回的时候,调用就行:
1
| Navigator.of(context).popUntil(ModalRoute.withName("/A"));
|
这样代码看起来很优雅,不会冗余。
另:
1
2
|
Navigator.of(context).popUntil((route) => route.isFirst);
|
# canPop
用来判断是否可以导航到新页面,返回的 bool 类型,一般是在设备带返回的物理按键时需要判断是否可以 pop 。
# maybePop
可以理解为 canPop 的升级, maybePop 会自动判断。如果当前的路由可以 pop ,则执行当前路由的 pop 操作,否则将不执行。
# removeRoute/removeRouteBelow
删除路由,同时执行 Route.dispose 操作,无过渡动画,正在进行的手势也会被取消。
# removeRoute

removeRoute.png
BPage 被移除了当前的路由栈。
如果在当前页面调用 removeRoute ,则类似于调用 pop 方法,区别就是无过渡动画,所以 removeRoute 也可以用来返回上一页。
# removeRouteBelow
移除指定路由底层的临近的一个路由,并且对应路由不存在的时候会报错。
同上。
综上:这个两个方法一般情况下很少用,而且必须要持有对应的要移除的路由。
一般用于立即关闭,如移除当前界面的弹出框等。
# 路由传值
常见的路由传值分为两个方面:
要注意的是,我们一般说静态路由不能传值,并不是说一定不能用于传值,而是因为静态路由一般需要在 MaterialApp 内的 routes 属性进行显式声明,在这里使用构造函数传值无实际意义。
如:
1
2
3
4
5
6
7
8
9
10
| MaterialApp(
initialRoute: "/",
routes: {
"/":(context) => RootPage(),
"/A":(context) => APage("title"),
"/B":(context) => BPage(),
"/C":(context) => CPage(),
},
);
|
# 向下级路由传值
# 1、构造函数传值
首先构造一个可以带参数的构造函数:
1
2
3
4
5
6
| class APage extends StatefulWidget {
String title;
APage(this.title);
@override
_APageState createState() => _APageState();
}
|
在路由跳转的时候传值:
1
2
3
| Navigator.of(context).push(MaterialPageRoute(
builder: (context) => APage("这是传入的参数"),
));
|
在 APage 拿到传入的值:
1
2
3
4
|
Container(
child: Text(widget.title),
)
|
# 2、ModalRoute 传值
在 Navigator.of(context).push 的跳转方式中, MaterialPageRoute 的构造参数中 可以看到有 RouteSettings 的属性, RouteSettings 就是当前路由的基本信息
1
2
3
4
5
| const RouteSettings({
this.name,
this.isInitialRoute = false,
this.arguments,
});
|
路由跳转时设置传递参数:
1
2
3
4
5
6
| Navigator.of(context).push(MaterialPageRoute(
settings: RouteSettings(name:"/A",arguments: {"argms":"这是传入A的参数"}),
builder: (context) => APage(),
));
或使用静态路由pushName:
Navigator.of(context).pushNamed("/A",arguments:{"argms":"这是传入A的参数"});
|
在 APage 中取值:
1
2
| Map argms = ModalRoute.of(context).settings.arguments;
print(argms["argms"]);
|
# 返回上级路由时传值
就是在调用 APage 中调用 pop 返回路由的时候传参
1
| Navigator.of(context).pop("这是pop返回的参数值");
|
在上一级路由获取:
1
2
3
4
5
6
7
| Navigator.of(context).push(MaterialPageRoute(
builder: (context) => APage(),
)).then((value){
print(value);
});
或
String value = await Navigator.of(context).pushNamed('/xxx');
|
1
2
3
4
| textDirection: TextDirection.ltr,
mainAxisSize: MainAxisSize.max,
mainAxisAlignment: MainAxisAlignment.spaceEvenly,
crossAxisAlignment: CrossAxisAlignment.start,
|
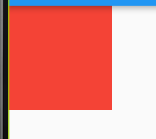
# Column - 纵向
概念:纵轴的宽度,默认使用子组件最大宽度
此时,红色和黄色容器宽度为 100 绿色为 150,整个容器就会使用 最大的子组件宽度 150 来表示自己
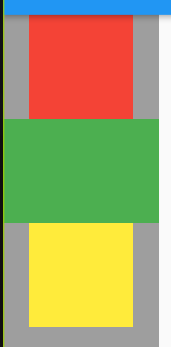
Column 代码演示:
1
2
3
4
5
6
7
8
9
10
11
12
13
14
15
16
17
18
19
20
21
22
23
24
25
26
27
28
29
30
| class LayoutDemo extends StatelessWidget {
@override
Widget build(BuildContext context) {
return Scaffold(
appBar: AppBar(
title: Text("布局练习"),
),
body: Container(
color: Colors.grey,
child: Column(children: [
Container(
width: 100,
height: 100,
color: Colors.red,
),
Container(
width: 150,
height: 100,
color: Colors.green,
),
Container(
width: 100,
height: 100,
color: Colors.yellow,
),
]),
)
);
}
}
|
# Row - 横向
概念:和 Colunm 相似,纵轴的宽度,默认使用子组件最大高度
此时,红色和黄色容器高度为 100 绿色为 200,整个容器就会使用 最大的子组件高度 200 来表示自己
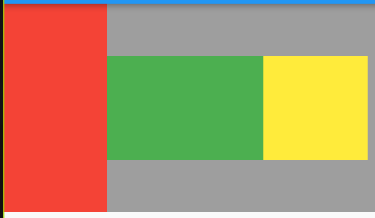
Row 代码演示
1
2
3
4
5
6
7
8
9
10
11
12
13
14
15
16
17
18
19
20
21
22
23
24
25
26
27
28
29
30
31
32
33
34
35
| class LayoutDemo extends StatelessWidget {
@override
Widget build(BuildContext context) {
return Scaffold(
appBar: AppBar(
title: Text("布局练习"),
),
body: Container(
color: Colors.grey,
child: Row(
textDirection: TextDirection.ltr,
mainAxisSize: MainAxisSize.max,
mainAxisAlignment: MainAxisAlignment.spaceEvenly,
crossAxisAlignment: CrossAxisAlignment.start,
children: [
Container(
width: 100,
height: 200,
color: Colors.red,
),
Container(
width: 150,
height: 100,
color: Colors.green,
),
Container(
width: 100,
height: 100,
color: Colors.yellow,
),
]),
)
);
}
}
|
# Flutter 弹性布局 (Flex):
flutter 为我们提供了 Flex 这个 widget 来制造弹性布局
Flex 默认 必传方向 Axis
children 使用 Expanded 来包裹,可以设置 flex 权重,根据数字大小来设置权重
1
2
3
4
5
6
7
8
9
10
11
12
13
14
15
16
17
18
19
20
21
22
23
24
25
26
27
28
29
30
31
32
33
34
35
| class LayoutDemo extends StatelessWidget {
@override
Widget build(BuildContext context) {
return Scaffold(
appBar: AppBar(
title: Text("布局练习"),
),
body: Container(
color: Colors.grey,
child: Flex(
direction: Axis.vertical,
children: [
Expanded(child:
Container(
width: 100,
height: 200,
color: Colors.red,
),flex: 2,),
Expanded(child:
Container(
width: 100,
height: 200,
color: Colors.green,
),flex: 2,),
Expanded(child:
Container(
width: 100,
height: 200,
color: Colors.yellow,
),flex: 2,),
],
),
));
}
}
|
# Flutter 流式布局 (Wrap):
flutter 为我们提供了 Wrap 这个 widget 来制造弹性布局
使用 有状态的 StatefulWidget 来构建 wrap 布局
1
2
3
4
5
6
7
8
9
10
11
12
13
14
15
16
17
18
19
20
21
22
23
24
25
26
27
28
29
30
31
32
33
34
35
36
| class WrapDemo extends StatefulWidget {
@override
State<WrapDemo> createState() => _WrapDemoState();
}
class _WrapDemoState extends State<WrapDemo> {
var list = <int>[];
@override
void initState() {
super.initState();
for (var i = 0; i < 20; i++) {
list.add(i);
}
}
@override
Widget build(BuildContext context) {
return Wrap(
direction: Axis.horizontal,
alignment: WrapAlignment.start,
spacing: 1.0,
runSpacing: 1.0,
children: list.map((e) => Container(
height: 100,
width: 100,
child: Text(
e.toString(),
style: TextStyle(
color: Colors.black,
fontSize: 20
)
),
color: Colors.blue,
)).toList()
);
}
}
|
# Flutter 层叠布局 (Stack):
flutter 为我们提供了 Stack 这个 widget 来制造层叠布局
我们设置了两个容器 div,在层叠布局中,如果后一个容器,比前面的容器大,那么就会遮挡,原理是为什么?
- flutter 在绘画时,从 x 0 y 0 开始绘画,也就是 左上角
- 意味着两个容器绘画开始的坐标都是相同的,只不过宽高不一样
- 那么如果第一个容器宽高为 100 第二个为 150 就理所应当的遮住啦!
1
2
3
4
5
6
7
8
9
10
11
12
13
14
15
16
17
18
19
20
21
22
23
24
| class StackDemo extends StatelessWidget {
@override
Widget build(BuildContext context) {
return Container(
color: Colors.grey,
width: double.infinity,
child: Stack(
alignment: AlignmentDirectional.center,
children: [
Container(
color: Colors.green,
width: 150,
height: 150,
),
Container(
color: Colors.red,
width: 100,
height: 100,
),
],
),
);
}
}
|
# Flutter 定位布局 (Positioned):
flutter 为我们提供了 Positioned 这个 widget 来制造层叠布局
如果 Positioned 设置了宽高,那么子组件不生效
1
2
3
4
5
6
7
8
|
top: 10,
bottom: 10,
那么就不能设置高度 height
left: 10,
right: 10,
那么就不能设置宽度 width
|
代码演示:
1
2
3
4
5
6
7
8
9
10
11
12
13
14
15
16
17
18
19
20
21
22
23
24
25
26
27
28
29
30
31
32
33
34
35
36
37
| class StackDemo extends StatelessWidget {
@override
Widget build(BuildContext context) {
return Container(
color: Colors.grey,
width: double.infinity,
child: Stack(
alignment: AlignmentDirectional.center,
children: [
Container(
color: Colors.green,
width: 150,
height: 150,
),
Container(
color: Colors.red,
width: 100,
height: 100,
),
Positioned(
child: Container(
color: Colors.yellow,
width: 300,
height: 300,
),
top: 50,
left: 150,
right: 150,
bottom: 50,
)
],
),
);
}
}
|
# Flutter 相对定位 (Align):
flutter 为我们提供了 Align 这个 widget 来制造层叠布局
要点:只会相对于父组件来定位,而不是屏幕
1
2
3
4
5
6
7
8
9
10
11
12
13
14
15
16
| class AlignDemo extends StatelessWidget {
@override
Widget build(BuildContext context) {
return Container(
width: 200,
height: 200,
color: Colors.green,
child: Align(
alignment: Alignment.center,
child: FlutterLogo(
size: 60,
),
),
);
}
}
|
# Flutter 的内外边距 Padding、Margin
flutter 为我们提供了 padding 和 margin 这量个 属性来设置内外边距
内边距:当前容器内的组件对于当前容器的距离
外边距:当前容器距离父类容器的距离
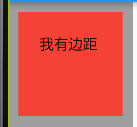
代码演示:
1
2
3
4
5
6
7
8
9
10
11
12
13
14
15
16
| class PaddingAndMarginDemo extends StatelessWidget {
@override
Widget build(BuildContext context) {
return Container(
width: 100,
height: 100,
color: Colors.red,
margin: EdgeInsets.all(10),
padding: EdgeInsets.all(20),
child: Text("我有边距"),
);
}
}
|
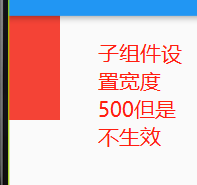
要点:子 widget 没有设置宽高的时候取自己设置的最大宽高
ConstrainedBox 的特点就是可以设置最大或者最小的宽高,子组件怎么设置都不可以超过这个宽高
代码演示:
1
2
3
4
5
6
7
8
9
10
11
12
13
14
15
16
17
18
| class ConstrainedBoxDemo extends StatelessWidget {
@override
Widget build(BuildContext context) {
return ConstrainedBox(
constraints: BoxConstraints(
maxHeight: 100,
maxWidth: 100,
minHeight: 50,
minWidth: 50,
),
child: Container(
width: 500,
height: 500,
color: Colors.red,
),
);
}
}
|
要点:如果父容器指定了宽高,那么子组件不可以修改宽高
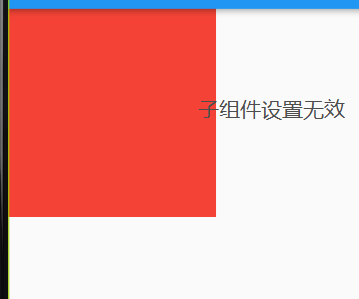
代码演示:
1
2
3
4
5
6
7
8
9
10
11
12
13
14
15
| class ConstrainedBoxDemo extends StatelessWidget {
@override
Widget build(BuildContext context) {
return SizedBox(
child: Container(
color: Colors.red,
width: 200,
height: 200,
),
);
}
}
|
flutter 为我们提供了 BoxDecoration 这量个 widget 来设置样式装饰
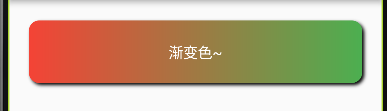
代码演示:
1
2
3
4
5
6
7
8
9
10
11
12
13
14
15
16
17
18
19
20
21
22
23
24
25
26
27
28
29
30
31
32
33
34
35
36
37
38
39
40
41
42
43
| class ConstrainedBoxDemo extends StatelessWidget {
@override
Widget build(BuildContext context) {
return Container(
margin: EdgeInsets.all(20),
width: double.infinity,
child: DecoratedBox(
decoration: BoxDecoration(
gradient: LinearGradient(
colors: [
Colors.red,
Colors.green,
],
),
borderRadius: BorderRadius.circular(10.0),
boxShadow: [
BoxShadow(
color: Colors.black,
offset: Offset(2.0,2.0),
blurRadius: 2,
)
],
),
child: Padding(
padding: EdgeInsets.only(
left: 100,
right: 100,
top: 20,
bottom: 20
),
child: Text(
"渐变色~",
style: TextStyle(
color: Colors.white
),
textAlign: TextAlign.center,
),
),
),
);
}
}
|
要点:当 Container 设置了 foregroundDecoration(前景) 的背景颜色,那么子组件将不会显示
要点:当 Container 设置了 decoration(背景) 的背景颜色,那么子组件将会显示
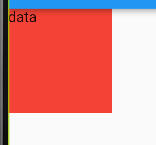
设置内边距并旋转 0.5
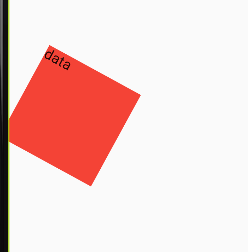
代码演示
1
2
3
4
5
6
7
8
9
10
11
12
13
14
15
| class ContarinerDemo extends StatelessWidget {
@override
Widget build(BuildContext context) {
return Container(
margin: EdgeInsets.all(100),
width: 100,
height: 100,
child: Text("data"),
decoration: BoxDecoration(
color: Colors.red
),
transform: Matrix4.rotationZ(0.5),
);
}
}
|
1.MateriaApp 是 flutter 的根节点,flutter 规定必须要 MateriaApp 来作为根节点展示
2. 在 MateriaApp 可以设置路由,每个子页面必须由 Scaffold 来包裹
3. 每个 Scaffold 包含两个部分 appBar(头部),body(展示体)
# Flutter 的 AppBar:
Scaffold 中的 AppBar 有很多特性:
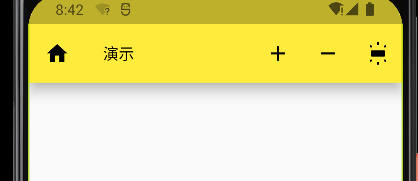
代码演示
1
2
3
4
5
6
7
8
9
10
11
12
13
14
15
16
17
18
19
20
21
22
23
24
25
26
27
28
29
30
31
32
33
34
35
36
37
38
39
40
41
42
43
| class PageDemo extends StatefulWidget {
@override
State<PageDemo> createState() => _PageDemoState();
}
class _PageDemoState extends State<PageDemo> {
@override
Widget build(BuildContext context) {
return Scaffold(
appBar: AppBar(
leading: IconButton(
onPressed: () {
print("点击了!");
},
icon: Icon(Icons.home)
),
title: Text(
"演示",
style: TextStyle(fontSize: 15),
),
actions: [
IconButton(
onPressed: () {
print("点击了加!");
},
icon: Icon(Icons.add)),
IconButton(
onPressed: () {
print("点击了减!");
},
icon: Icon(Icons.remove)),
IconButton(
onPressed: () {
print("点击了灯!");
},
icon: Icon(Icons.wb_iridescent_rounded)),
],
elevation: 10.0,
),
);
}
}
|
# Flutter 的顶部 TabBar 选项卡:
Flutter 提供 顶部 TabBar 选项卡
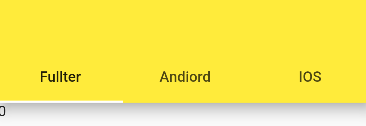
代码演示:
1
2
3
4
5
6
7
8
9
10
11
12
13
14
15
16
17
18
19
20
21
22
23
24
25
26
27
28
29
30
31
32
33
34
35
36
37
38
39
40
41
42
43
44
45
46
47
48
49
50
51
52
53
54
| class PageDemo extends StatefulWidget {
@override
State<PageDemo> createState() => _PageDemoState();
}
class _PageDemoState extends State<PageDemo> with SingleTickerProviderStateMixin{
List tabs = ["Fullter", "Andiord", "IOS"];
late TabController _controller = TabController(length: tabs.length, vsync: this);
int _index = 0;
@override
void initState() {
_controller = TabController(
initialIndex: _index,
length: tabs.length,
vsync: this
);
_controller.addListener(() {
setState(() {
_index = _controller.index;
});
});
super.initState();
}
@override
void dispose() {
_controller.dispose();
super.dispose();
}
@override
Widget build(BuildContext context) {
return Scaffold(
appBar: AppBar(
elevation: 10.0,
bottom: TabBar(
controller: _controller,
tabs: tabs.map((e) => Tab(
text: e,
)).toList(),
),
),
body: Text(_index.toString()),
);
}
}
|
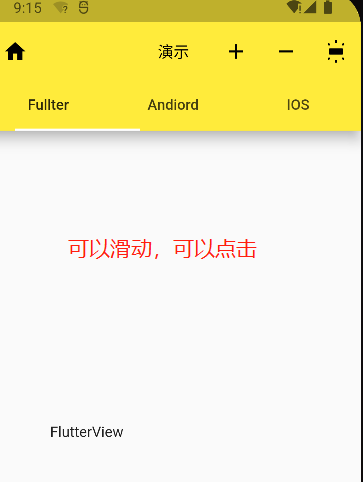
# Flutter 的顶部 TabBar 选项卡(进阶)
使用 Flutter 提供 顶部 TabBarView 组件来设置选项卡
代码演示:
1
2
3
4
5
6
7
8
9
10
11
12
13
14
15
16
17
18
19
20
21
22
23
24
25
26
27
28
29
30
31
32
33
34
35
36
37
38
39
40
41
42
43
44
45
46
47
48
49
50
51
52
53
54
55
56
57
58
59
60
61
62
63
64
65
66
67
68
69
70
71
72
73
74
75
| class PageDemo extends StatefulWidget {
List<Widget> widgets = [FlutterView(),AndroidView(),IOSView()];
@override
State<PageDemo> createState() => _PageDemoState();
}
class _PageDemoState extends State<PageDemo> with SingleTickerProviderStateMixin{
List tabs = ["Fullter", "Andiord", "IOS"];
late TabController _controller = TabController(length: tabs.length, vsync: this);
@override
void initState() {
_controller = TabController(
length: tabs.length,
vsync: this
);
super.initState();
}
@override
void dispose() {
_controller.dispose();
super.dispose();
}
@override
Widget build(BuildContext context) {
return Scaffold(
appBar: AppBar(
elevation: 10.0,
bottom: TabBar(
controller: _controller,
tabs: tabs.map((e) => Tab(
text: e,
)).toList(),
),
),
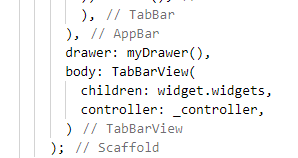
body: TabBarView(
children: widget.widgets,
controller: _controller,
)
);
}
}
class FlutterView extends StatelessWidget {
@override
Widget build(BuildContext context) {
return Center(
child: Text("FlutterView"),
);
}
}
class AndroidView extends StatelessWidget {
@override
Widget build(BuildContext context) {
return Center(
child: Text("AndroidView"),
);
}
}
class IOSView extends StatelessWidget {
@override
Widget build(BuildContext context) {
return Center(
child: Text("IOSView"),
);
}
}
|
# Flutter 的侧抽屉 Drawer 样式
使用 Flutter 提供 侧抽屉 Drawer 组件来设置抽屉样式
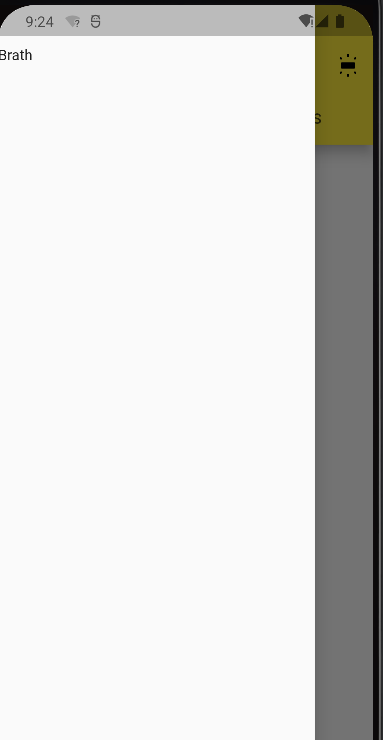
# 要点:drawer 是 Scaffold 中的属性,并不是 AppBar 的
代码演示:
1
2
3
4
5
6
7
8
9
10
11
12
13
14
15
16
17
18
19
| class myDrawer extends StatelessWidget {
@override
Widget build(BuildContext context) {
return Drawer(
child: MediaQuery.removePadding(
context: context,
child: Column(
crossAxisAlignment: CrossAxisAlignment.start,
children: [
Padding(padding: EdgeInsets.only(top: 40),
child: Text("Brath"),
)
],
),
removeTop: true,
),
);
}
}
|
# Flutter 的底部选项卡
使用 flutter 提供的 bottomNavigationBar 来做底部选项卡,做到点击卡片切换页面
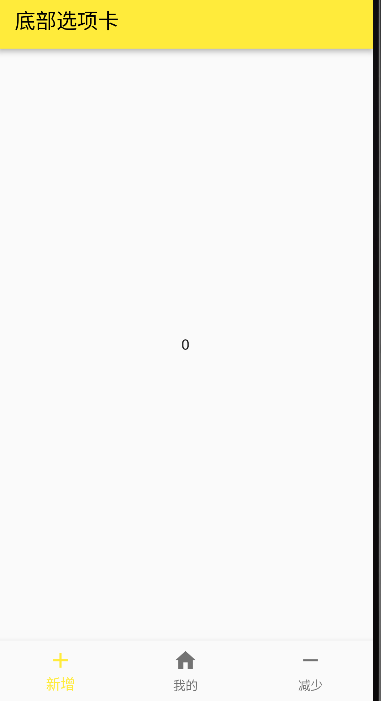
代码演示:
1
2
3
4
5
6
7
8
9
10
11
12
13
14
15
16
17
18
19
20
21
22
23
24
25
26
27
28
29
30
31
32
33
34
35
36
37
38
39
40
41
42
43
|
class BottomNavigatorBarDemo extends StatefulWidget {
const BottomNavigatorBarDemo({ Key? key }) : super(key: key);
@override
State<BottomNavigatorBarDemo> createState() => _BottomNavigatorBarDemoState();
}
class _BottomNavigatorBarDemoState extends State<BottomNavigatorBarDemo> {
int _index = 0;
@override
Widget build(BuildContext context) {
return Scaffold(
appBar: AppBar(
title: Text("底部选项卡"),
),
bottomNavigationBar: BottomNavigationBar(
items: [
BottomNavigationBarItem(
icon: Icon(Icons.add),
label: "新增"
),
BottomNavigationBarItem(
icon: Icon(Icons.home),
label: "我的"
),
BottomNavigationBarItem(
icon: Icon(Icons.remove),
label: "减少"
),
],
currentIndex: _index,
onTap: (v){
setState(() {
_index = v;
});
},
),
body: Center(child: Text(_index.toString())),
);
}
}
|
# Flutter 的底部选项卡(进阶版)
使用 flutter 提供的 bottomNavigationBar 来做底部选项卡,做到按钮居中布局
要点:两种实现方式,BottomNavigationBar 中如果 BottomNavigationBarItem 超过三个需要设置 type👇否则不显示
1
| type: BottomNavigationBarType.fixed
|
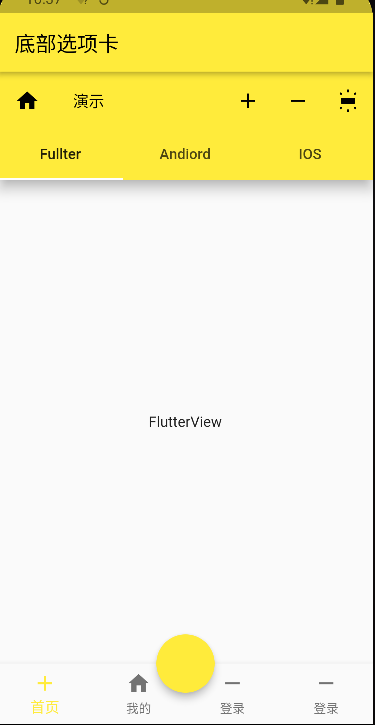
代码演示:
1
2
3
4
5
6
7
8
9
10
11
12
13
14
15
16
17
18
19
20
21
22
23
24
25
26
27
28
29
30
31
32
33
34
35
36
37
38
39
40
41
42
43
44
45
46
47
48
49
50
51
52
53
54
55
56
57
| class BottomNavigatorBarDemo extends StatefulWidget {
List<Widget> widgets = [
PageDemo(),
LayoutDemo(),
LoginPage(),
LoginPage(),
];
@override
State<BottomNavigatorBarDemo> createState() => _BottomNavigatorBarDemoState();
}
class _BottomNavigatorBarDemoState extends State<BottomNavigatorBarDemo> {
int _index = 0;
@override
Widget build(BuildContext context) {
return Scaffold(
appBar: AppBar(
title: Text("底部选项卡"),
),
bottomNavigationBar: BottomNavigationBar(
type: BottomNavigationBarType.fixed,
items: [
BottomNavigationBarItem(
icon: Icon(Icons.add),
label: "首页"
),
BottomNavigationBarItem(
icon: Icon(Icons.home),
label: "我的"
),
BottomNavigationBarItem(
icon: Icon(Icons.remove),
label: "登录"
),
BottomNavigationBarItem(
icon: Icon(Icons.remove),
label: "登录"
),
],
currentIndex: _index,
onTap: (v){
setState(() {
_index = v;
});
},
),
floatingActionButtonLocation: FloatingActionButtonLocation.centerDocked,
floatingActionButton: FloatingActionButton(
onPressed: (){
print("object");
},
),
body: widget.widgets[_index],
);
}
}
|
第二种实现方式:
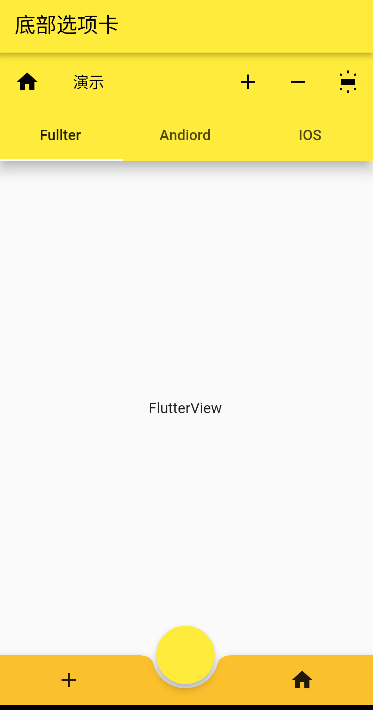
代码演示:
1
2
3
4
5
6
7
8
9
10
11
12
13
14
15
16
17
18
19
20
21
22
23
24
25
26
27
28
29
30
31
32
33
34
35
36
37
38
| class _BottomNavigatorBarDemoState extends State<BottomNavigatorBarDemo> {
int _index = 0;
@override
Widget build(BuildContext context) {
return Scaffold(
appBar: AppBar(
title: Text("底部选项卡"),
),
bottomNavigationBar: BottomAppBar(
color: Theme.of(context).primaryColorDark,
shape: CircularNotchedRectangle(),
child: Row(
mainAxisAlignment: MainAxisAlignment.spaceAround,
children: [
IconButton(
onPressed: (){
},
icon: Icon(Icons.add)),
SizedBox(height: 16),
IconButton(
onPressed: (){
},
icon: Icon(Icons.home)),
]
),
),
floatingActionButtonLocation: FloatingActionButtonLocation.centerDocked,
floatingActionButton: FloatingActionButton(
onPressed: (){
print("object");
},
),
body: widget.widgets[_index],
);
}
}
|
flutter 为我们提供了 ListView 这个 widget 来展示我们的列表
源码展示:
1
2
3
4
5
6
7
8
9
10
11
12
13
14
15
16
17
18
19
20
21
22
23
|
ListView({
Key? key,
Axis scrollDirection = Axis.vertical,
bool reverse = false,
ScrollController? controller,
bool? primary,
ScrollPhysics? physics,
bool shrinkWrap = false,
EdgeInsetsGeometry? padding,
this.itemExtent,
this.prototypeItem,
bool addAutomaticKeepAlives = true,
bool addRepaintBoundaries = true,
bool addSemanticIndexes = true,
double? cacheExtent,
List<Widget> children = const <Widget>[],
int? semanticChildCount,
DragStartBehavior dragStartBehavior = DragStartBehavior.start,
ScrollViewKeyboardDismissBehavior keyboardDismissBehavior = ScrollViewKeyboardDismissBehavior.manual,
String? restorationId,
Clip clipBehavior = Clip.hardEdge,
})
|
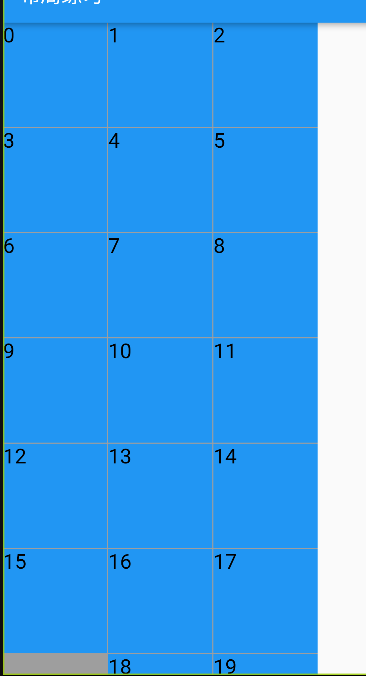
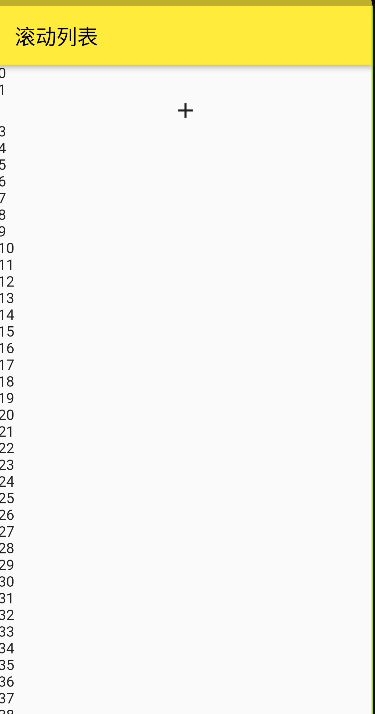
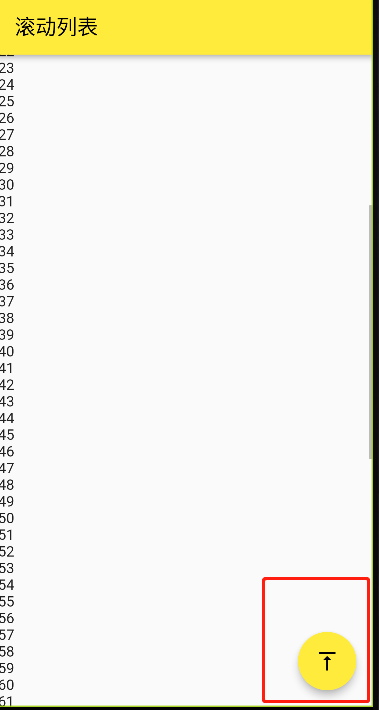
# 用 ListView 实现滑动列表,并且可以细粒度显示每个 list 数据,并且可以点击按钮返回顶部
代码展示:
1
2
3
4
5
6
7
8
9
10
11
12
13
14
15
16
17
18
19
20
21
22
23
24
25
26
27
28
29
30
31
32
33
34
35
36
37
38
39
40
41
42
43
44
45
46
47
48
49
50
51
52
53
54
55
56
57
58
59
60
61
62
63
64
65
66
67
68
69
70
71
72
73
74
75
76
77
78
79
80
81
82
83
84
85
86
87
| class ListViewDemo extends StatefulWidget {
@override
State<ListViewDemo> createState() => _ListViewDemoState();
}
class _ListViewDemoState extends State<ListViewDemo> {
List<int> list = [];
ScrollController _controller = ScrollController();
bool show = false;
@override
void initState() {
super.initState();
_controller = ScrollController();
_controller.addListener(() {
if(_controller.offset >= 100 && show == false){
setState(() {
show = true;
});
}else if(_controller.offset < 100 && show == true){
setState(() {
show = false;
});
}
});
for (var i = 0; i < 100; i++) {
list.add(i);
}
}
@override
void dispose() {
super.dispose();
_controller.dispose();
}
@override
Widget build(BuildContext context) {
return Scaffold(
appBar: AppBar(
title: Text("滚动列表"),
),
floatingActionButton: show ? FloatingActionButton(
child: Icon(Icons.vertical_align_top_outlined),
onPressed: (){
_controller.animateTo(
0,
duration: Duration(milliseconds: 300),
curve: Curves.slowMiddle
);
},
): null,
body: Scrollbar(
child: RefreshIndicator(
child: ListView.builder(
itemBuilder: (BuildContext context,int index){
if(index == 2){
return Icon(Icons.add);
}
return Text(list[index].toString());
},
itemCount: list.length,
controller: _controller,
),
onRefresh: _onRefresh,
)
)
);
}
Future _onRefresh() async{
await Future.delayed(
Duration(seconds: 3),
(){
print("三");
}
);
return "三";
}
}
|
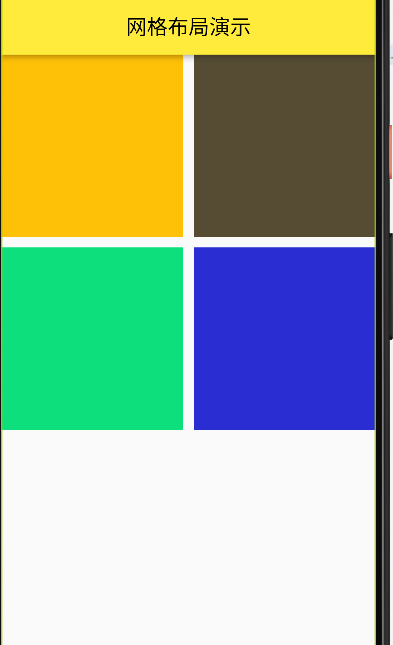
flutter 为我们提供了 GridView 这个 widget 来展示我们的网格数据
源码展示:
1
2
3
4
5
6
7
8
9
10
11
12
13
14
15
16
17
18
19
20
21
| GridView({
Key? key,
Axis scrollDirection = Axis.vertical,
bool reverse = false,
ScrollController? controller,
bool? primary,
ScrollPhysics? physics,
bool shrinkWrap = false,
EdgeInsetsGeometry? padding,
required this.gridDelegate,
bool addAutomaticKeepAlives = true,
bool addRepaintBoundaries = true,
bool addSemanticIndexes = true,
double? cacheExtent,
List<Widget> children = const <Widget>[],
int? semanticChildCount,
DragStartBehavior dragStartBehavior = DragStartBehavior.start,
Clip clipBehavior = Clip.hardEdge,
ScrollViewKeyboardDismissBehavior keyboardDismissBehavior = ScrollViewKeyboardDismissBehavior.manual,
String? restorationId,
})
|
代码展示:
1
2
3
4
5
6
7
8
9
10
11
12
13
14
15
16
17
18
19
20
21
22
23
24
25
26
27
28
29
30
31
32
| class Grid_view_demo extends StatelessWidget {
@override
Widget build(BuildContext context) {
return Scaffold(
appBar: AppBar(
centerTitle: true,
title: Text("网格布局演示"),
),
body: GridView(
gridDelegate: SliverGridDelegateWithFixedCrossAxisCount(
crossAxisCount: 2,
mainAxisSpacing: 10,
crossAxisSpacing: 10,
),
children: [
Container(
color: Colors.amber,
),
Container(
color: Color.fromARGB(255, 85, 76, 51),
),
Container(
color: Color.fromARGB(255, 14, 223, 125),
),
Container(
color: Color.fromARGB(255, 42, 45, 209),
),
],
),
);
}
}
|
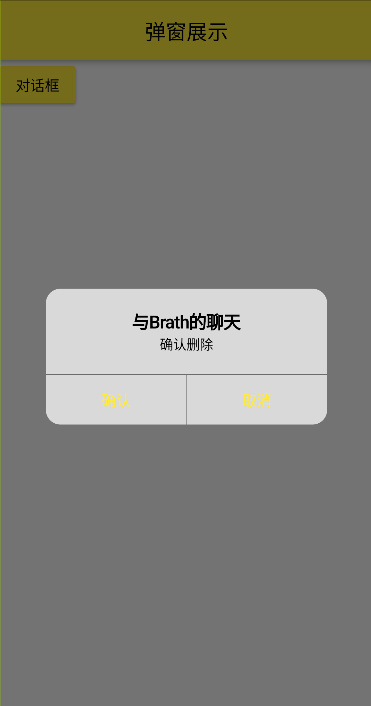
flutter 为我们提供了 AlertDialog 这个 widget 来展示我们的弹窗数据
源码阅读:
1
2
3
4
5
6
7
8
9
10
11
12
13
14
15
16
17
18
19
20
21
22
23
| const AlertDialog({
Key? key,
this.title,
this.titlePadding,
this.titleTextStyle,
this.content,
this.contentPadding = const EdgeInsets.fromLTRB(24.0, 20.0, 24.0, 24.0),
this.contentTextStyle,
this.actions,
this.actionsPadding = EdgeInsets.zero,
this.actionsAlignment,
this.actionsOverflowDirection,
this.actionsOverflowButtonSpacing,
this.buttonPadding,
this.backgroundColor,
this.elevation,
this.semanticLabel,
this.insetPadding = _defaultInsetPadding,
this.clipBehavior = Clip.none,
this.shape,
this.alignment,
this.scrollable = false,
})
|
# 图片为 IOS 风格的弹窗
代码展示:
1
2
3
4
5
6
7
8
9
10
11
12
13
14
15
16
17
18
19
20
21
22
23
24
25
26
27
28
29
30
31
32
33
34
35
36
37
38
39
40
41
42
43
44
45
46
47
48
49
50
51
52
53
54
55
56
57
58
59
| class AlertDialogDemo extends StatefulWidget {
@override
State<AlertDialogDemo> createState() => _AlertDialogDemoState();
}
class _AlertDialogDemoState extends State<AlertDialogDemo> {
@override
Widget build(BuildContext context) {
return Scaffold(
appBar: AppBar(
centerTitle: true,
title: Text("弹窗展示"),
),
body: Column(
children: [
ElevatedButton(
onPressed: _showAlert,
child: Text("对话框"))
],
),
);
}
void _showAlert() async{
var res = await showDialog(
context: context,
builder: (BuildContext context) {
return CupertinoAlertDialog(
title: Text("与Brath的聊天"),
content: Text("确认删除"),
actions: [
TextButton(onPressed: () {
Navigator.of(context).pop(true);
}, child: Text("确认")),
TextButton(onPressed: () {
Navigator.pop(context,false);
}, child: Text("取消")),
],
);
},
);
print(res);
}
}
|
flutter 为我们提供了 SimpleDialog 这个 widget 来展示我们的弹框数据
源码展示:
1
2
3
4
5
6
7
8
9
10
11
12
13
14
15
| const SimpleDialog({
Key? key,
this.title,
this.titlePadding = const EdgeInsets.fromLTRB(24.0, 24.0, 24.0, 0.0),
this.titleTextStyle,
this.children,
this.contentPadding = const EdgeInsets.fromLTRB(0.0, 12.0, 0.0, 16.0),
this.backgroundColor,
this.elevation,
this.semanticLabel,
this.insetPadding = _defaultInsetPadding,
this.clipBehavior = Clip.none,
this.shape,
this.alignment,
})
|

代码演示
1
2
3
4
5
6
7
8
9
10
11
12
13
14
15
16
17
18
19
20
21
22
23
24
25
26
27
28
29
30
31
32
33
34
35
36
37
38
39
40
41
42
43
44
45
46
47
48
49
50
51
52
53
54
| class AlertDialogDemo extends StatefulWidget {
@override
State<AlertDialogDemo> createState() => _AlertDialogDemoState();
}
class _AlertDialogDemoState extends State<AlertDialogDemo> {
List<int> list = [];
@override
void initState() {
super.initState();
for (var i = 0; i < 20; i++) {
list.add(i);
}
}
@override
Widget build(BuildContext context) {
return Scaffold(
appBar: AppBar(
centerTitle: true,
title: Text("弹窗展示"),
),
body: Column(
children: [
ElevatedButton(
onPressed: _showAlert,
child: Text("对话框")),
ElevatedButton(
onPressed: _showList,
child: Text("列表框")),
],
),
);
}
void _showList() async{
var res = await showDialog(
barrierDismissible: false,
context: context,
builder: (BuildContext context) {
return SimpleDialog(
title: Text("与Brath的聊天"),
children: list.map((e) => GestureDetector(
child: Text(e.toString()),
onTap: (){
Navigator.pop(context,e);
},
)).toList(),
);
},
);
print(res);
}
|
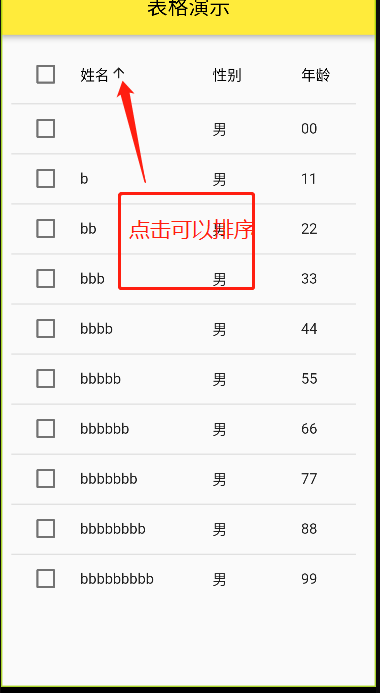
flutter 为我们提供了 Table 还有 DataTable 这两个常用 widget 来展示我们的表格
代码展示:
1
2
3
4
5
6
7
8
9
10
11
12
13
14
15
16
17
18
19
20
21
22
23
24
25
26
27
28
29
30
31
32
33
34
35
36
37
38
39
40
41
42
43
44
45
46
47
48
49
50
51
52
53
54
55
56
57
58
59
60
61
62
63
64
65
66
67
68
69
70
71
72
73
74
75
76
77
78
79
80
81
82
83
84
85
86
87
88
89
90
91
92
93
94
95
96
97
|
class TableDemo extends StatefulWidget {
@override
State<TableDemo> createState() => _TableDemoState();
}
class _TableDemoState extends State<TableDemo> {
List<Map> list = [];
int _sortColumnIndex = 0;
bool _sortAscending = true;
@override
void initState() {
super.initState();
for (var i = 0; i < 10; i++) {
list.add({
"name": "b" * i,
"gender": i % 1 == 0 ? "男" : "女",
"isSelect": false,
"age": i.toString() + i.toString(),
});
}
}
@override
Widget build(BuildContext context) {
return Scaffold(
appBar: AppBar(
centerTitle: true,
title: Text("表格演示"),
),
body: Padding(
padding: EdgeInsets.all(10),
child: DataTable(
sortColumnIndex: _sortColumnIndex,
sortAscending: _sortAscending,
columns: [
DataColumn(
onSort: (columnIndex, ascending) {
setState(() {
_sortAscending = ascending;
_sortColumnIndex = columnIndex;
list.sort((begin,end){
if(!ascending){
var c = begin;
begin = end;
end = c;
}
return begin["name"].toString().length.compareTo(end["name"].toString().length);
});
});
},
label: Text("姓名")
),
DataColumn(
label: Text("性别")
),
DataColumn(
label: Text("年龄")
),
],
rows: list.map((e) => DataRow(
selected: e["isSelect"],
onSelectChanged: (v){
setState(() {
if(e["isSelect"] != v){
e["isSelect"] = v;
}
});
},
cells: [
DataCell(Text(e["name"])),
DataCell(Text(e["gender"])),
DataCell(Text(e["age"])),
]
)
).toList(),
),
)
);
}
}
|
flutter 为我们提供了 Card 这个 widget 来展示我们的卡片数据
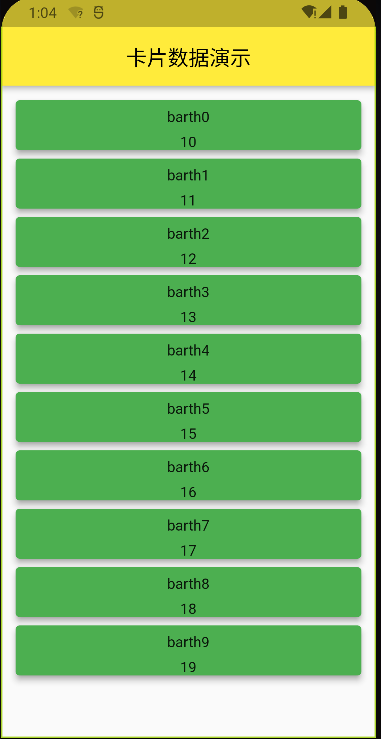
代码展示:
1
2
3
4
5
6
7
8
9
10
11
12
13
14
15
16
17
18
19
20
21
22
23
24
25
26
27
28
29
30
31
32
33
34
35
36
37
38
39
40
41
42
43
44
45
46
47
48
49
50
51
52
53
54
55
| class CardDemo extends StatefulWidget {
@override
State<CardDemo> createState() => _CardDemoState();
}
class _CardDemoState extends State<CardDemo> {
List<Map> list = [];
@override
void initState() {
super.initState();
for (var i = 0; i < 10; i++) {
list.add({
"age": 10 + i,
"name": "barth" + i.toString(),
});
}
}
Widget _itemBuilder(BuildContext context,int index){
return Card(
color: Colors.green,
shadowColor: Colors.grey,
elevation: 5.0,
child: Column(
children: [
SizedBox(height: 8),
Text(list[index]["name"]),
SizedBox(height: 8),
Text(list[index]["age"].toString()),
],
),
);
}
@override
Widget build(BuildContext context) {
return Scaffold(
appBar: AppBar(
centerTitle: true,
title: Text("卡片数据演示"),
),
body: Padding(
padding: EdgeInsets.all(10),
child: ListView.builder(
itemBuilder: _itemBuilder,
itemCount: list.length,
)
),
);
}
}
|
Flutter 为我们提供了 ListTile 这个 Widget 来展示标签
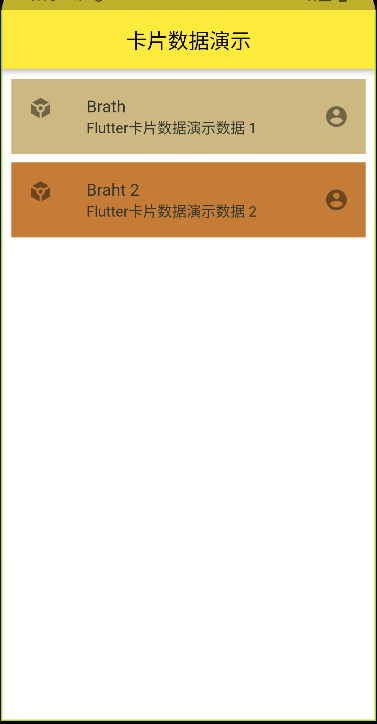
代码演示:
1
2
3
4
5
6
7
8
9
10
11
12
13
14
15
16
17
18
19
20
21
22
23
24
25
26
27
28
29
30
31
32
33
34
35
36
| @override
Widget build(BuildContext context) {
return Scaffold(
backgroundColor: Colors.white,
appBar: AppBar(
centerTitle: true,
title: Text("卡片数据演示"),
),
body: Padding(
padding: EdgeInsets.all(10),
child: ListView(
children: [
ListTile(
tileColor: Color.fromARGB(255, 204, 184, 128),
leading: Icon(Icons.token_sharp),
title: Text("Brath"),
textColor: Color.fromARGB(255, 49, 54, 42),
subtitle: Text("Flutter卡片数据演示数据 1 "),
trailing: Icon(Icons.account_circle_rounded),
),
SizedBox(height: 8),
ListTile(
tileColor: Color.fromARGB(255, 197, 124, 55),
leading: Icon(Icons.token_sharp),
title: Text("Braht 2"),
textColor: Color.fromARGB(255, 49, 54, 42),
subtitle: Text("Flutter卡片数据演示数据 2 "),
trailing: Icon(Icons.account_circle_rounded),
),
],
),
),
);
}
|
# Flutter 性能优化:
先看图片:
我们以看到,这张图片由三个容器构成,并且点击黄色容器,其数字会增加,理论上来说代码并没有任何问题。
但是,在我们打开 检测工具后,发现,当点击黄色容器时,所有容器都会重新渲染,这就造成了性能的损耗!
如何优化?
代码演示:
# 使用一个单独的 CountDemo 来对 黄色的容器进行封装,这样就可以做到单独渲染
# 因为 setState 会重新绘制当前组件(Column),单独封装后,他自己就是一个单独组件(CountDemo)
1
2
3
4
5
6
7
8
9
10
11
12
13
14
15
16
17
18
19
20
21
22
23
24
25
26
27
28
29
30
31
32
33
34
35
36
37
38
39
40
41
42
43
44
45
46
47
48
49
50
51
52
53
54
55
56
57
58
59
60
|
class performanceDemo extends StatefulWidget {
@override
State<performanceDemo> createState() => _performanceDemoState();
}
class _performanceDemoState extends State<performanceDemo> {
int count = 0;
@override
Widget build(BuildContext context) {
return Scaffold(
appBar: AppBar(
title: Text("性能优化专题"),
),
body: Column(
children: [
Container(
width: double.infinity,
height: 100,
color: Colors.red,
),
Container(
width: double.infinity,
height: 100,
color: Colors.yellow,
child: CountDemo(),
),
Container(
width: double.infinity,
height: 100,
color: Colors.blue,
)
],
),
);
}
}
class CountDemo extends StatefulWidget {
@override
State<CountDemo> createState() => _CountDemoState();
}
class _CountDemoState extends State<CountDemo> {
int count = 0;
@override
Widget build(BuildContext context) {
return GestureDetector(
child: Text(count.toString()),
onTap: (){
setState(() {
count ++;
});
},
);
}
}
|
# Flutter 的全局状态管理 Provider 非常重要!
# 我们分为四个步骤来学习全局状态管理 Provider
# 1、因为全局状态管理是单独的插件,所以我们第一步一定是导包
选择根目录下的 pubspec.yaml 依赖配置文件
以作者 Brath 的 flutter 版本 2.0 为例,使用 5.0.0 版本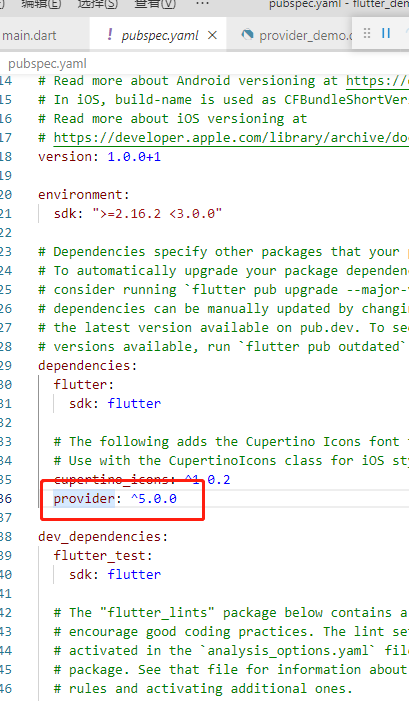
# 2、下载好依赖后,我们在 lib 目录创建文件夹:Provider 并在文件夹内创建一个 Count_provider.dart,作为我们的第一个全局状态类
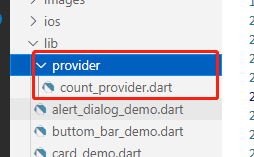
在类中写入代码:
# 要点:notifyListeners () 这个方法的作用就是实现局部刷新
1
2
3
4
5
6
7
8
| class CountProvider extends ChangeNotifier{
int _count = 0;
get count => _count;
void add(){
_count ++;
notifyListeners();
}
}
|
# 3、我们写一个新的类用于测试全局状态数据
要点:
1. 获取全局变量:
# 通过 Provider 的 of 方法(泛型我们的全局状态类)传入上下文对象,就可以获取 count
1
| Provider.of<CountProvider>(context).count.toString()
|
2. 修改全局变量:
# 通过上下文对象的 read 方法(泛型我们的全局状态类),就可以获取状态类中的方法,来操作
# Tips:不是从当前页使用方法修改全局变量,而是全局变量提供了方法供外部修改!
1
| context.read<CountProvider>().add();
|
1
2
3
4
5
6
7
8
9
10
11
12
13
14
15
16
17
18
19
20
21
22
23
24
25
26
27
28
29
30
31
32
33
34
35
36
37
38
39
40
41
42
43
44
45
46
47
48
49
50
51
52
53
54
55
| class ProviderDemo extends StatefulWidget {
@override
State<ProviderDemo> createState() => _ProviderDemoState();
}
class _ProviderDemoState extends State<ProviderDemo> {
@override
Widget build(BuildContext context) {
return Scaffold(
appBar: AppBar(
centerTitle: true,
title: Text("Provider全局状态管理"),
),
body: Column(
children: [
ElevatedButton(
onPressed: (){
Navigator.of(context).pushNamed("ProviderDemo2");
},
child: Icon(Icons.add_task_rounded)),
Text(
Provider.of<CountProvider>(context).count.toString()
)
],
),
floatingActionButton: FloatingActionButton(
child: Icon(Icons.sanitizer_sharp),
onPressed: (){
context.read<CountProvider>().add();
},
),
);
}
}
class ProviderDemo2 extends StatelessWidget {
@override
Widget build(BuildContext context) {
return Scaffold(
appBar: AppBar(
centerTitle: true,
title: Text("Provider2"),
),
body: FloatingActionButton(
child: Icon(Icons.sanitizer_sharp),
onPressed: (){
context.read<CountProvider>().add();
},
),
);
}
}
|
4、在 main.dart 中修改启动方式
1
2
3
4
5
6
7
8
9
10
11
12
13
14
15
16
17
18
19
20
| main() {
runApp(
MultiProvider(
providers: [
ChangeNotifierProvider(
create: (context) => CountProvider(),
),
],
child: MyApp(),
));
}
|
# Flutter 的网络请求(DIO)
# Flutter 在 pub.dev 为我们提供了许多网络请求组件,我们选择用 DIO 来做请求组件
使用方法:
# 1、因为网络请求是单独的插件,所以我们第一步一定是导包
选择根目录下的 pubspec.yaml 依赖配置文件
以作者 Brath 的 flutter 版本 2.0 为例,使用 4.0.0 版本
# 2、编写代码:
1
2
3
4
5
6
7
8
9
10
11
12
13
14
15
16
17
18
19
20
21
22
23
24
25
26
27
28
29
30
31
32
33
34
35
36
37
38
39
40
41
42
43
44
45
46
47
48
49
50
51
52
53
54
55
| class DioDemo extends StatefulWidget {
@override
State<DioDemo> createState() => _DioDemoState();
}
class _DioDemoState extends State<DioDemo> {
Dio _dio = Dio();
@override
void initState() {
super.initState();
_dio.options.baseUrl = "https://www.XXX.XXX:0000/";
}
@override
Widget build(BuildContext context) {
return Scaffold(
appBar: AppBar(
centerTitle: true,
title: Text("网络请求演示"),
),
body: Column(
children: [
ElevatedButton(
onPressed: _get,
child: Text("getUserinfo")
),
]
),
);
}
void _get() async{
var res2 = await _dio.get(
"get/getData",
queryParameters: {
"id": 1
},
options: Options(
headers: {
"token": "header-Token"
}
)
);
print(res2.toString());
}
}
|
# 1. 请求本地连接,ip 地址错误
# 2. 未添加网络请求权限
# 3. 请求的地址是 http,不是 https
# 4. 与服务端的请求参数不同,导致无法请求到接口
# Flutter 的设计模式(MVVM)(Model View ViewModel)
# MVVM 就是 Model View ViewModel 的简写。
# Model :处理接口请求数据
# View :展示页面
# ViewModel:处理业务逻辑(相当于 Model、View 的链接层)
# 简单流程:view 通知 viewModel 层,viewModel 通知 Model 层调用接口,viewModel 层接收 Model 的数据,响应给 view 层展示
# 我们通过几个步骤来演示 MVVM 模式的请求流程,以及他的优缺点
# 1、首先创建 Model View ViewModel 三个文件夹
# 2、编写 Model 层 (请求数据)
1
2
3
4
5
6
7
8
9
10
11
12
13
14
15
16
| class MvvmModel{
dynamic get(int id) async {
print("开始调用userinfo接口");
var res = await Dio().get(
"https://xxx:0000/gerUserInfo",
queryParameters: {
"userId": id
},
);
print("调用完毕");
return res;
}
}
|
# 3、编写 View 层 (接收、展示数据)
1
2
3
4
5
6
7
8
9
10
11
12
13
14
15
16
17
18
19
20
21
22
23
24
25
26
27
28
29
| class MvvmViewDemo extends StatefulWidget {
@override
State<MvvmViewDemo> createState() => _MvvmViewDemoState();
}
class _MvvmViewDemoState extends State<MvvmViewDemo> {
dynamic res;
@override
Widget build(BuildContext context) {
return Scaffold(
appBar: AppBar(
centerTitle: true,
title: Text("View展示页面"),
),
body: Column(
children: [
ElevatedButton(
onPressed: () async {
context.read<MvvmViewModel>().get(1);
},
child: Text("调用ViewwModel获取用户userinfo")
),
],
),
);
}
}
|
# 4、编写 ViewModel 层 (整合 view 以及 model:view 调用 ViewModel ,ViewModel 调用 model 返回结果给 view)
tips:在调用完接口后跳转时,因为 Navigator 需要一个上下文对象,但是我们当前没有上下文对象,所以要在 main 入口定义一个对象:
main.dart👇
1
2
3
4
5
6
7
8
9
10
| final GlobalKey<NavigatorState> navigatorkey = GlobalKey<NavigatorState>();
class MyApp extends StatelessWidget {
@override
Widget build(BuildContext context) {
return MaterialApp(
navigatorKey: navigatorkey,
);
}
}
|
MvvmViewModel.dart👇
1
2
3
4
5
6
7
8
9
10
11
12
13
| class MvvmViewModel extends ChangeNotifier{
MvvmModel _model = MvvmModel();
void get(int id) async {
Response res = await _model.get(id);
print(res.data);
print(res.headers);
print(res.statusCode);
print(res.realUri);
Navigator.of(navigatorkey.currentContext!).pushNamed("DioDemo");
}
}
|
# 5、DIO 返回值 Response 介绍
1
2
3
4
5
| Response res = await _model.get(id);
print(res.data);
print(res.headers);
print(res.statusCode);
print(res.realUri);
|
本篇至此就结束啦!如果你读到了这里,不妨给我点个赞,我叫 Brath,是一个非科班出身的技术狂!
我的博客 brath.top 欢迎访问!
# 关于我
Brath 是一个热爱技术的 Java 程序猿,公众号「InterviewCoder」定期分享有趣有料的精品原创文章!

非常感谢各位人才能看到这里,原创不易,文章如果有帮助可以关注、点赞、分享或评论,这都是对我的莫大支持!